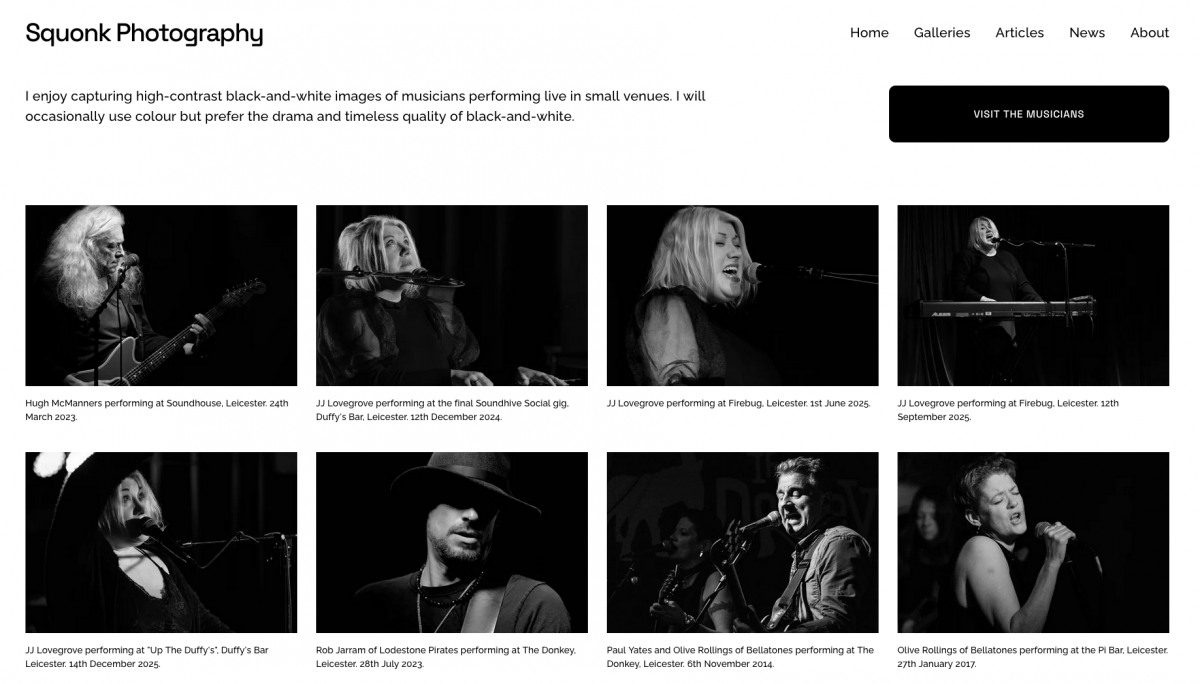
For a long time, I’ve wanted to build a portfolio website for my photography. This week I’ve finally taken the plunge and started to make it happen.
I now have a new website, Squonk Photography, and I’m gradually adding content, both photos and articles.
This blog will continue as it is, I have no plans to replace it with something on my new website. Indeed, my new website links back to this blog.
So why did I want a new website? It was primarily so that I could have a single place to point people to view my photos. It’s all very well to post them to this blog or the various social media sites, but the nature of those platforms means only the most recent photos are readily available to view. I now have control over what is shown and how.
I’m also building the site on a platform that will make it easy to add the ability to sell prints and other products if I want to do so in the future.
And so much has changed since I last did any web development twenty-plus years ago. For a start, the early data I have indicates that around 60% of my traffic comes from mobile phones. I have a lot to learn and I need to grow my familiarity and confidence in the platform I’m using.
December was a busy month for me. I guess it can be for a lot of people. Time seems to compress into a rush of things that need to be done before December 25th or the New Year.
This December, I made a trip up to Lancaster to visit my sister and brother-in-law, I photographed the wedding of two great old friends, and I attended a couple of gigs. There was also excitement around the release of the album “Affinity” on December 5th, an album I provided the cover photo for and one which I’ve listened to a lot since its release. I’m now looking forward to receiving a copy of this on vinyl, and I’ll be interested to see how my photo looks on the front of an LP cover.
This was all punctuated by catching a nasty cold (I’m guessing at one of the gigs), navigating the rounds of Christmas-related shopping, a broken down oven that needed fixing (great timing, I got it fixed on December 23rd) and visits to friends.
Wedding photography. Yes, I have done it several times before, but it’s something I find very stressful, and I have turned people down on many occasions over the years.
But this one was an occasion I felt more relaxed about. Two very close and special friends had decided to ‘make it official’ after 20 years together. The wedding was on December 16th, 20 years to the day after their first date. They are two lovely people who I knew wouldn’t be putting incredible pressure on me.
Despite this, I decided to visit the wedding venue a couple of weeks in advance to scout it out and see what the lighting would be like. A trademark phrase of a good friend of mine is “set yourself up to succeed”, and I felt better for getting an idea in advance of the conditions I would encounter. As it transpired, I was shown the wrong room when I visited, but conditions were very similar, so it wasn’t a problem.
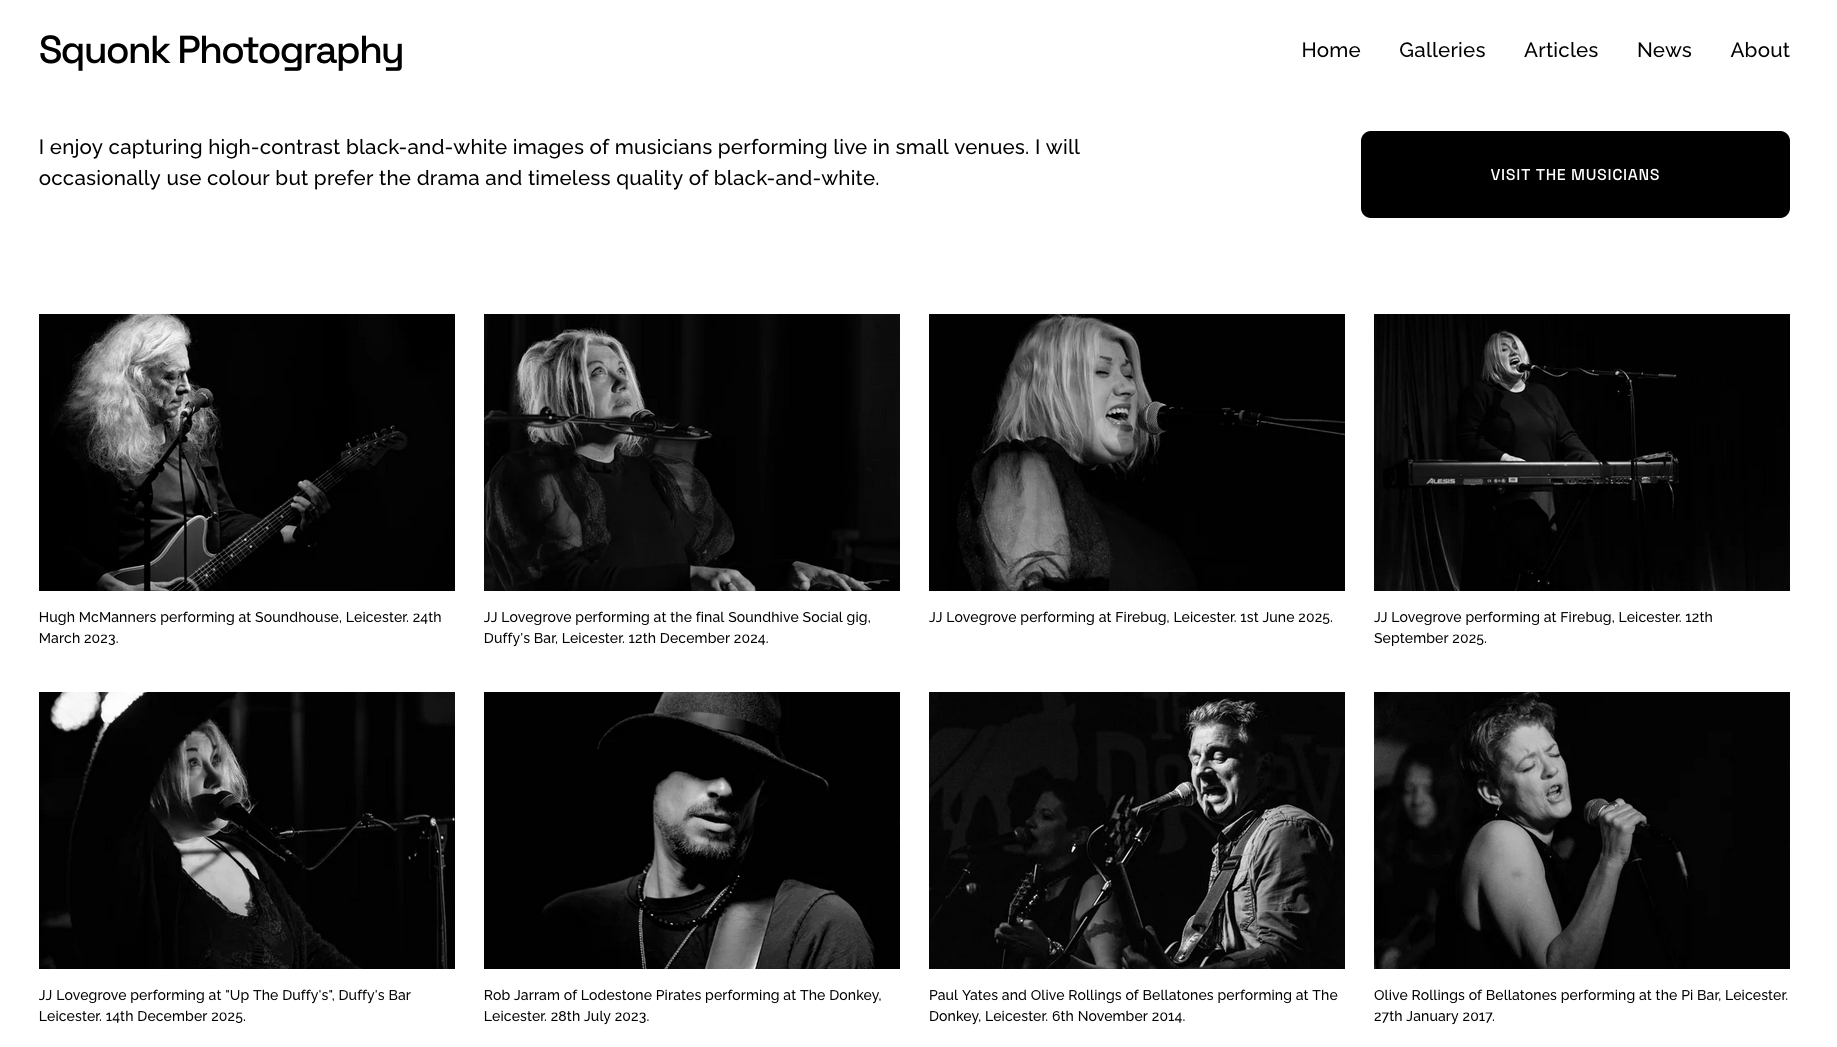
On the day, as I drove to the venue, I felt incredibly anxious, but this eased once I arrived and started shooting. The couple had booked a lovely old two-tone pink Vauxhall Cresta to transport them to and from the venue, and my brief was to make sure I got plenty of photos of them with the car. I’m not going to share photos here of any of the people attending the wedding out of respect for their privacy, but I wanted to share one of this beautiful old car.
Pink Vauxhall Cresta hired for wedding transport.
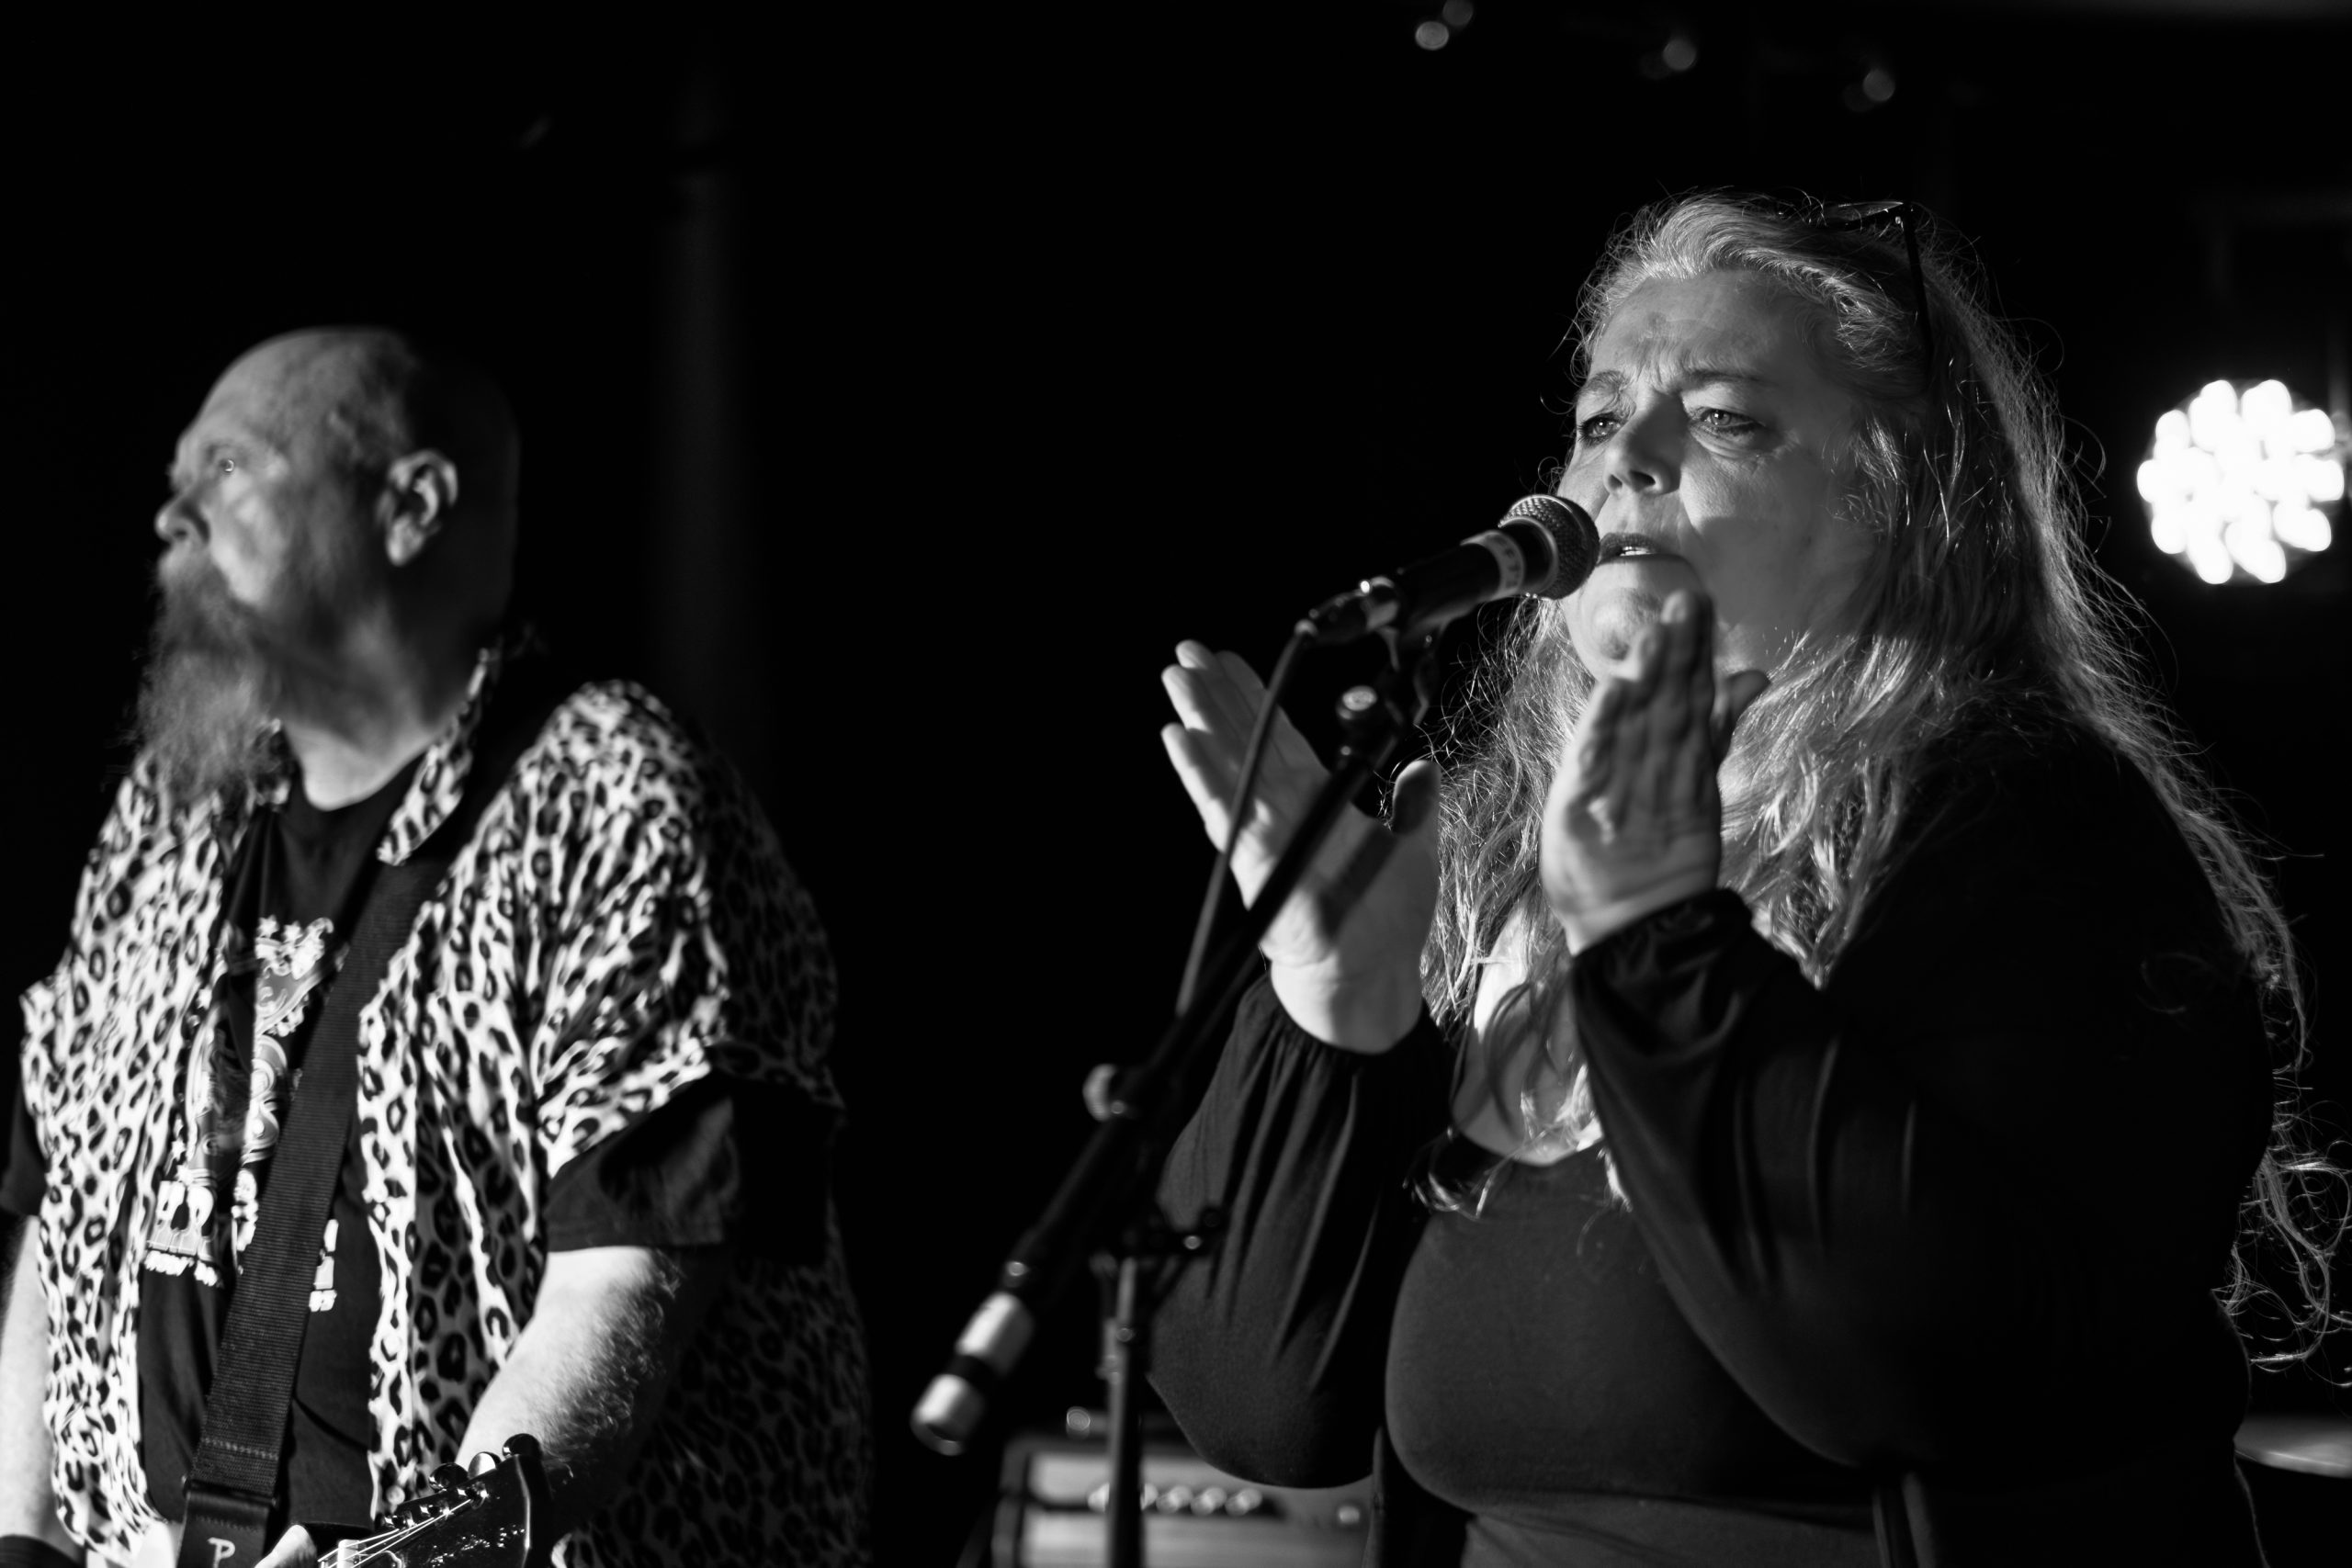
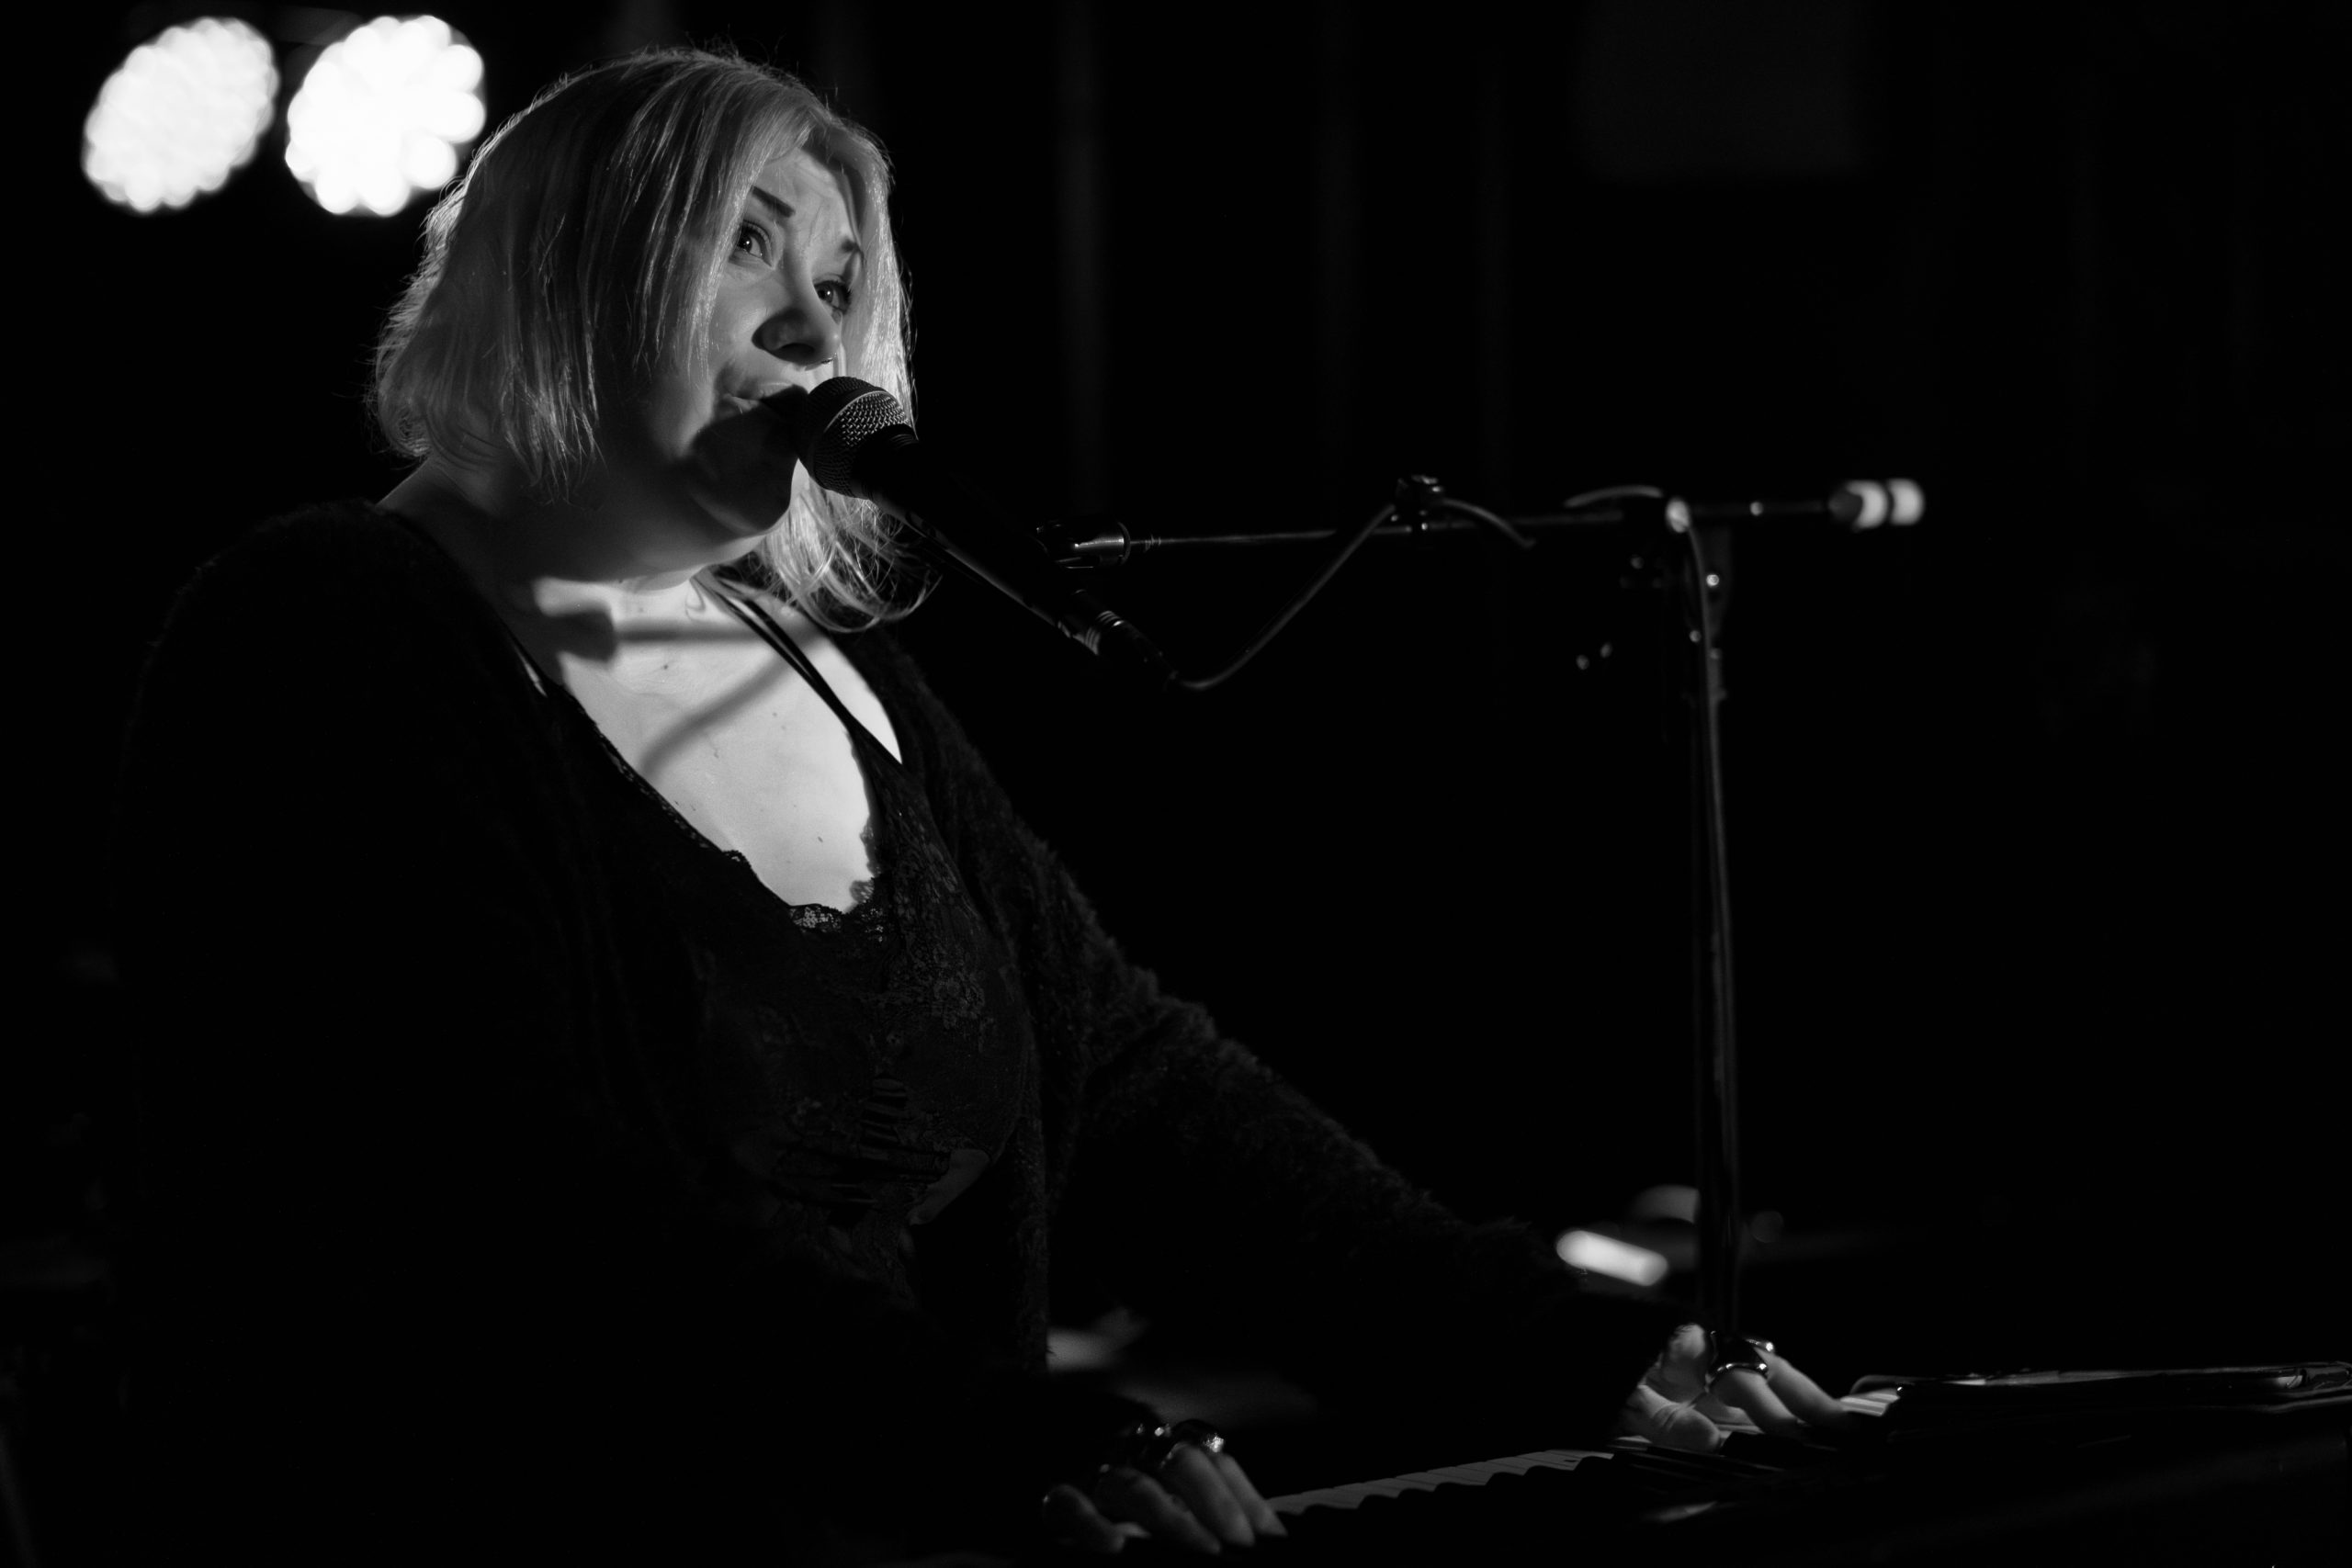
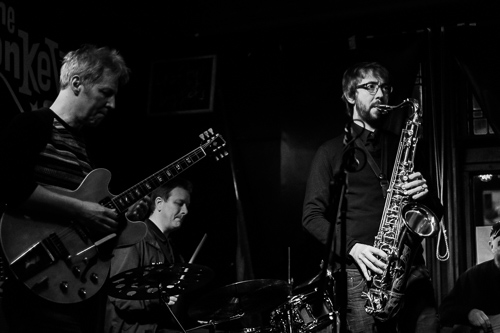
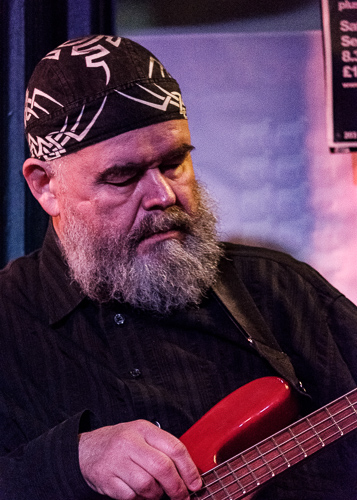
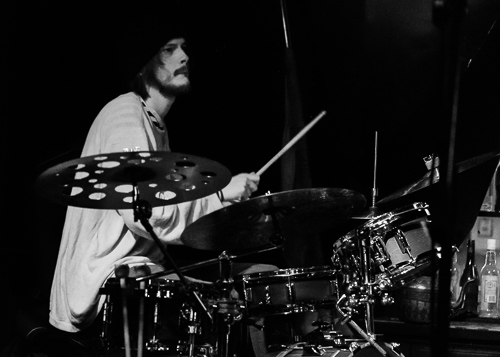
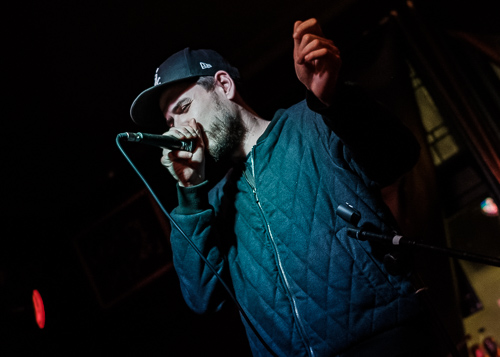
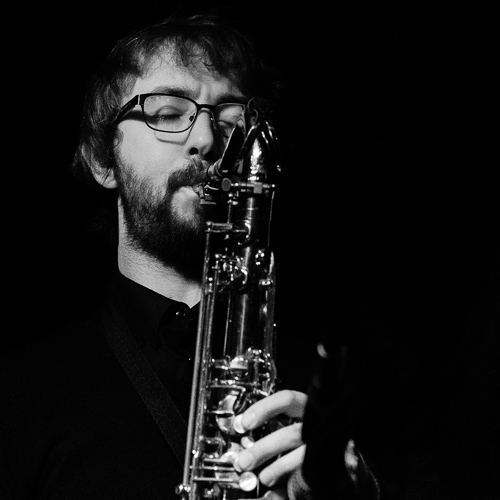
Two gigs I really wanted to get to in December both featured JJ Lovegrove. Both were in Leicester, one at the O2 Academy and one at Duffy’s Bar as part of the excellent “Up The Duffy’s” monthly event.
For the gig at O2 Academy, JJ was supporting Then Jerico. It’s a larger venue than I’m used to shooting in, and I decided to leave my camera at home that night. This was mainly because I thought the venue wouldn’t like it. It was only when I was at the gig, chatting with Judi, that I learned I could have requested a photographer’s pass and been allowed to shoot from the ‘press pit’ for the first three songs of each set. I’m kicking myself a bit, as having that kind of access for photography at a gig has been something I’ve dreamed of for many years. It was a great night, and I was delighted that Judi got lots of new ears listening to her music.
“Up The Duffy’s” is a monthly music night held at Duffy’s Bar in Leicester. It evolved out of the brilliant “Soundhive Social” events, which were hosted here to encourage people back to gigs in the wake of the Covid-19 pandemic. I don’t really do “New Year Resolutions”, but I have told myself that I really need to make it to more nights of “Up The Duffy’s” this year.
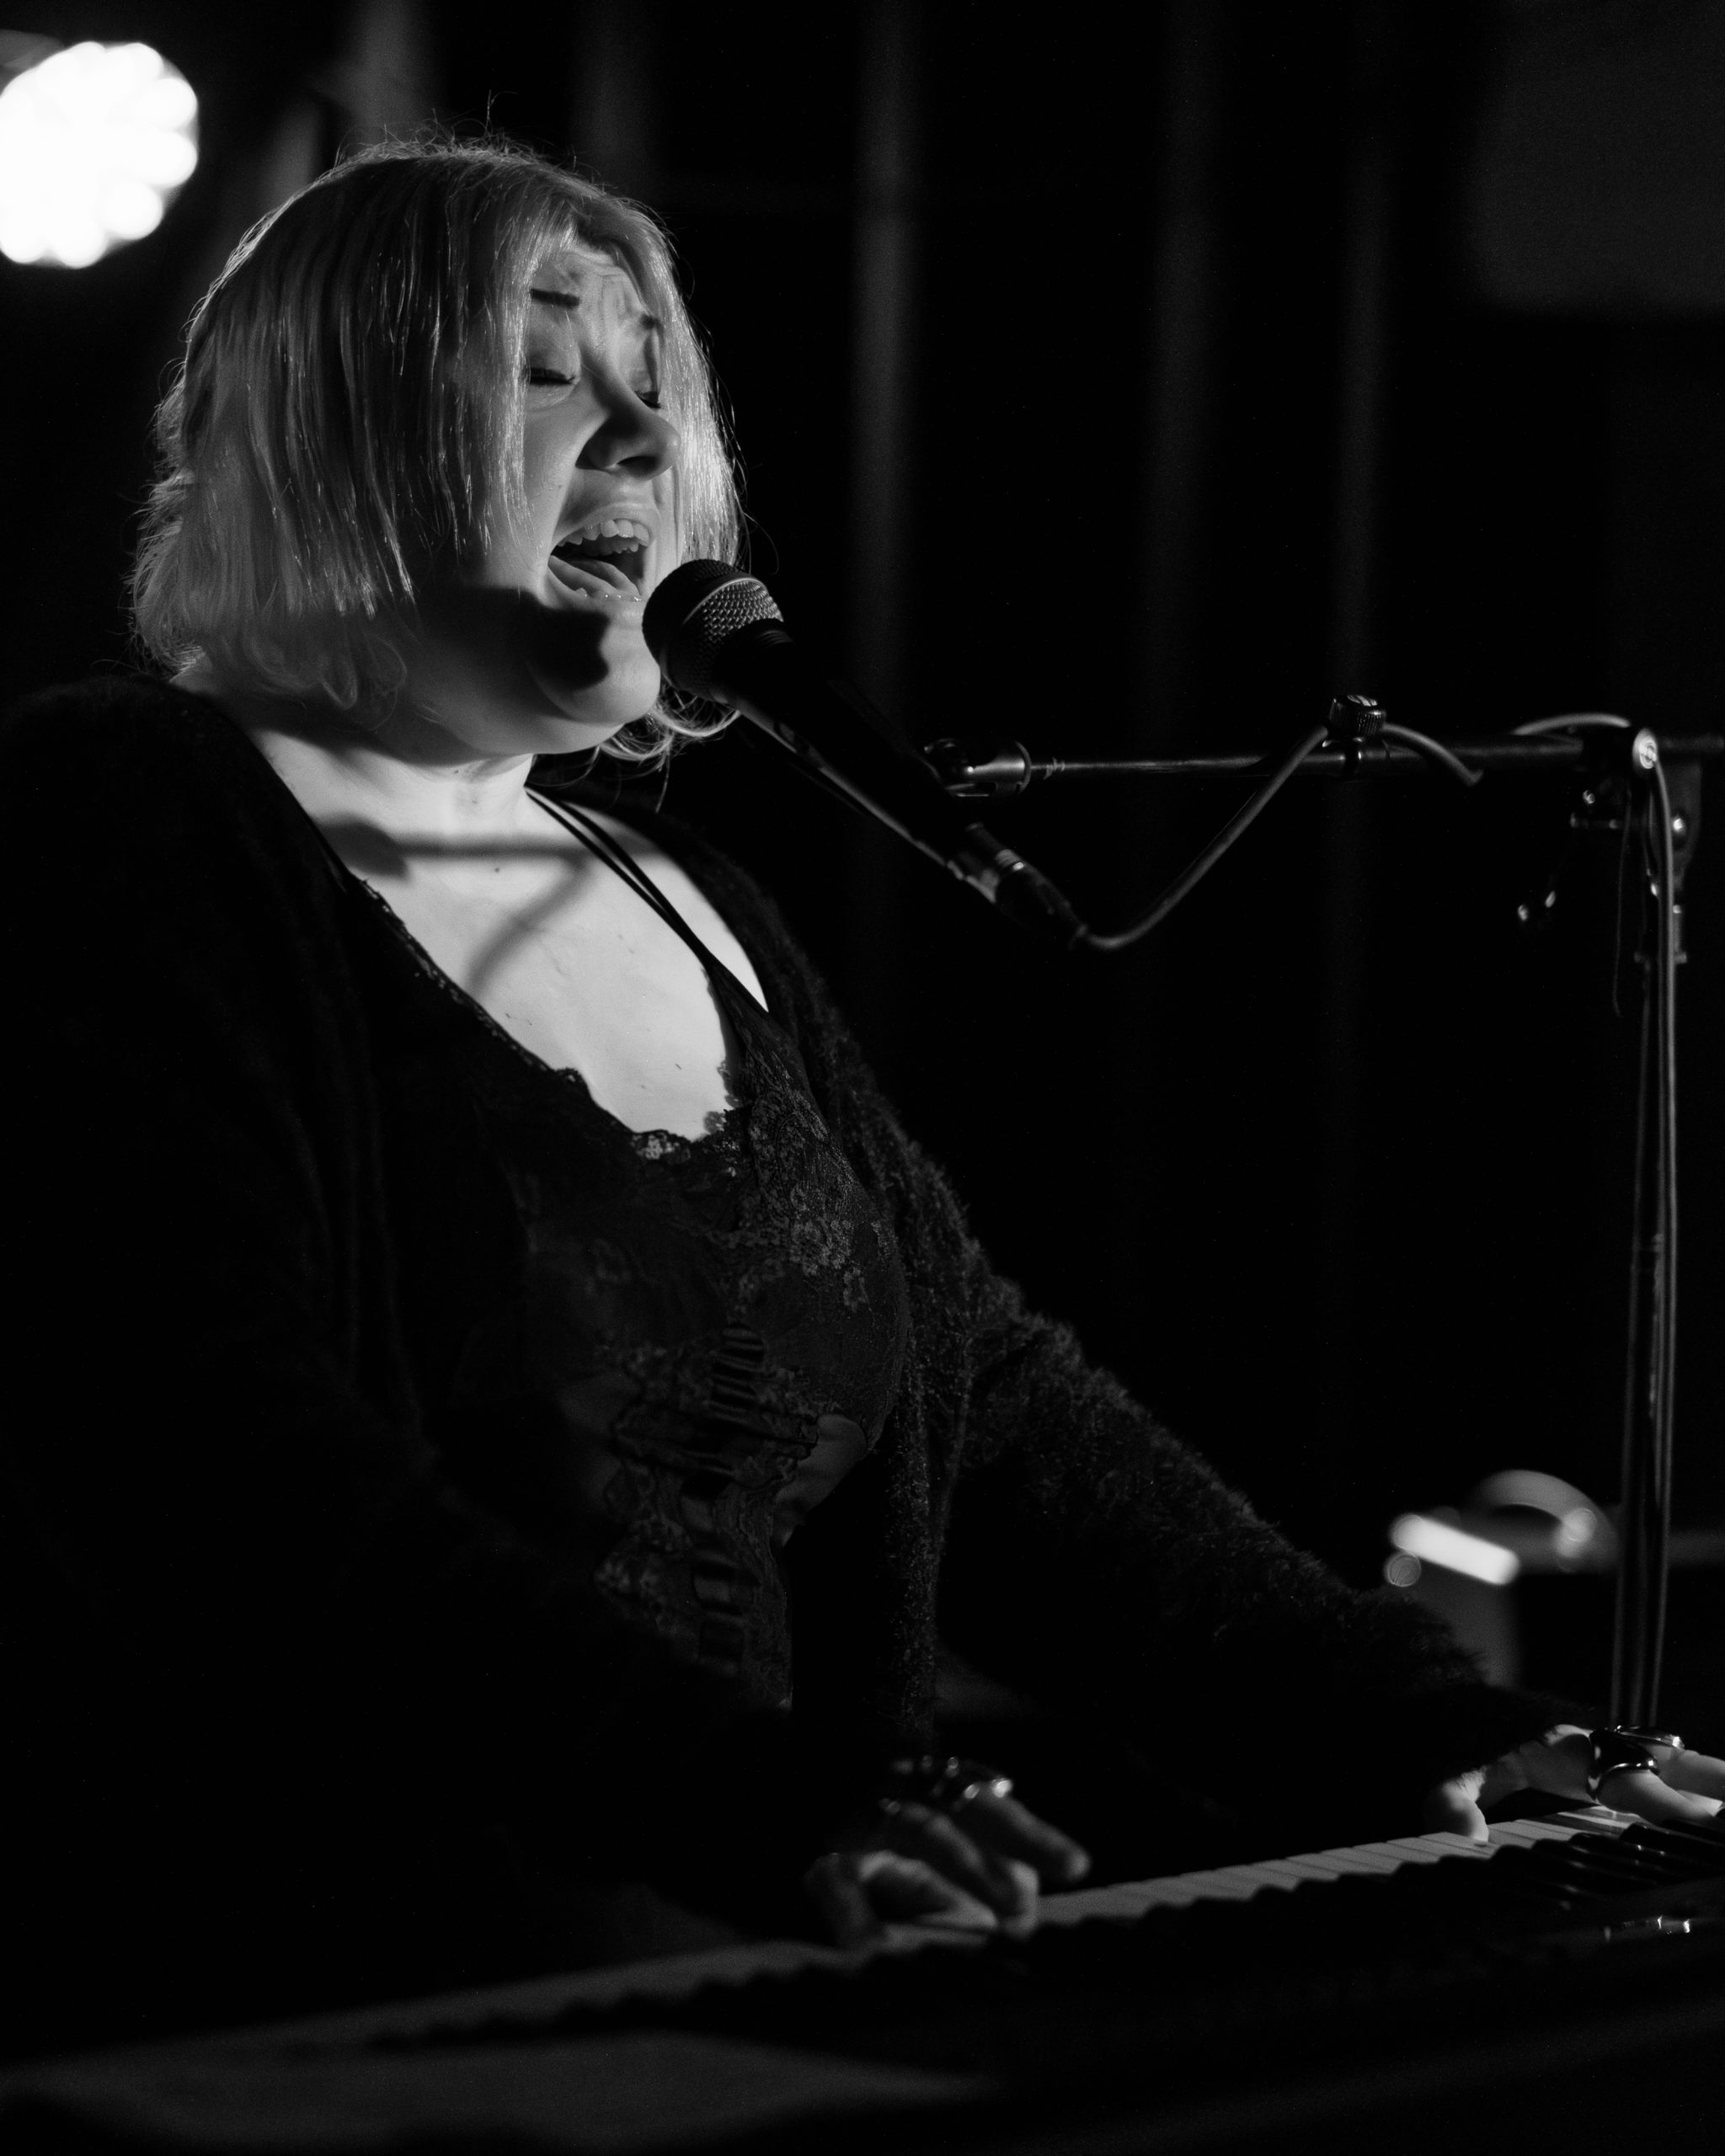
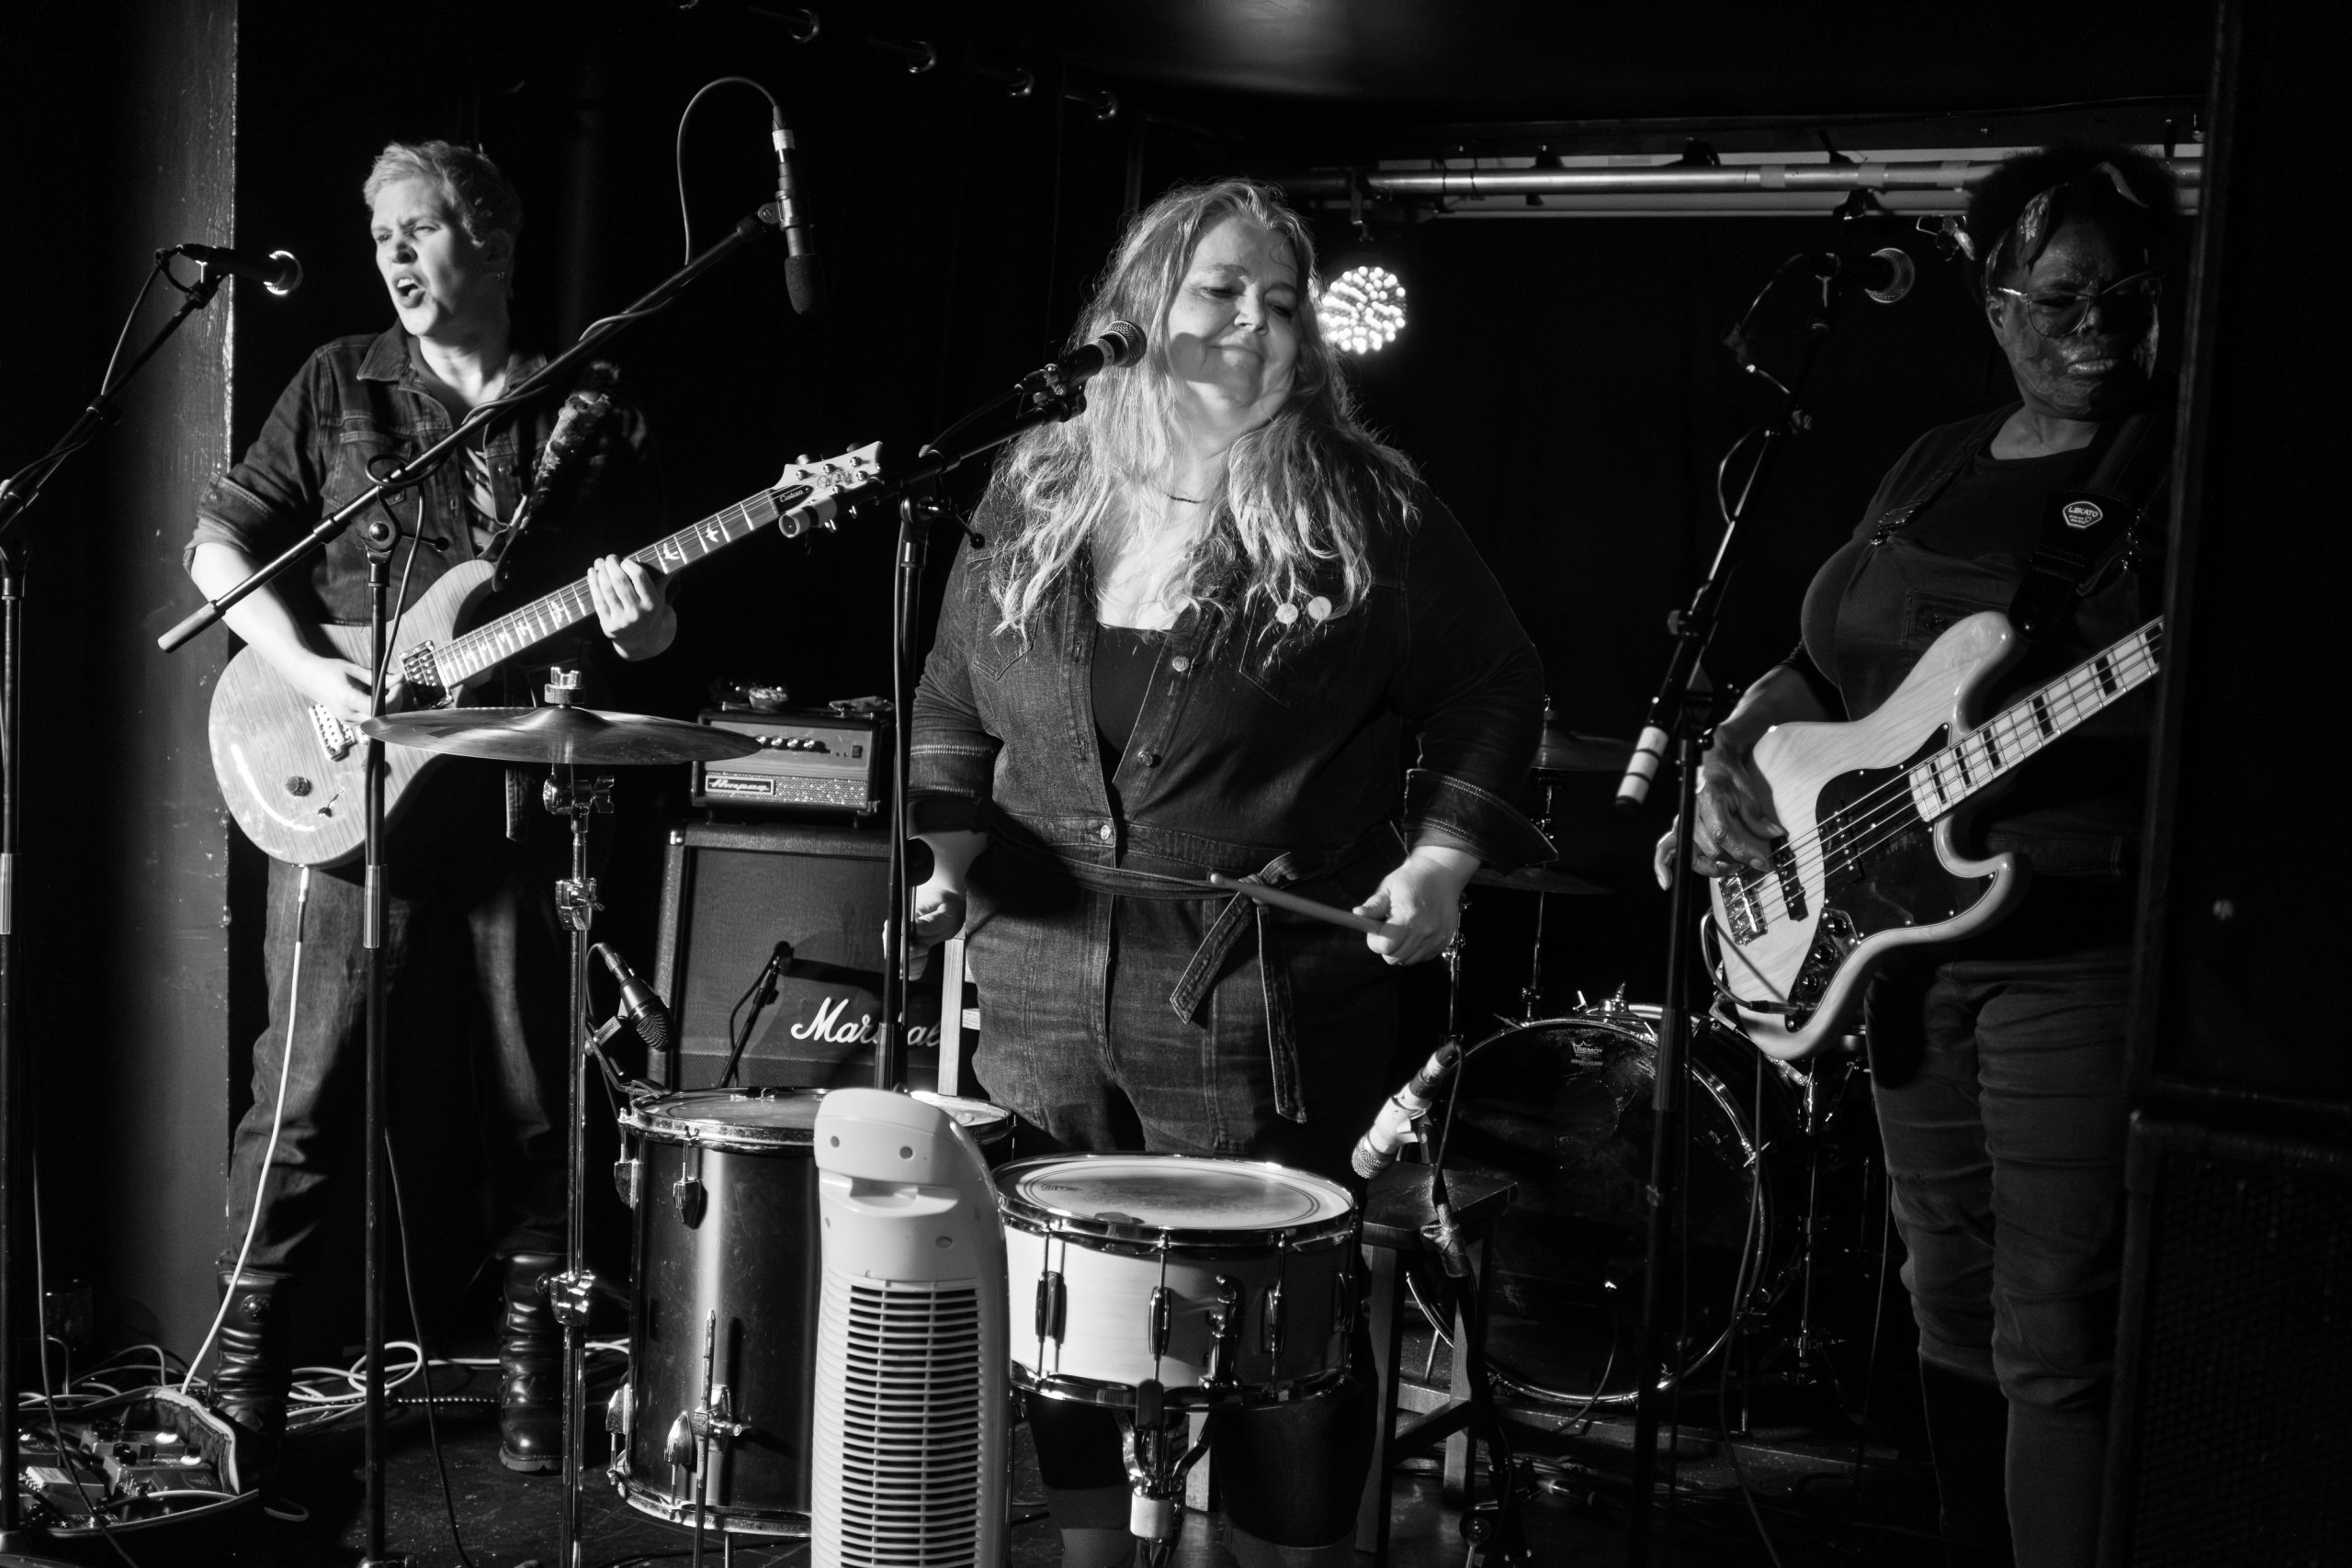
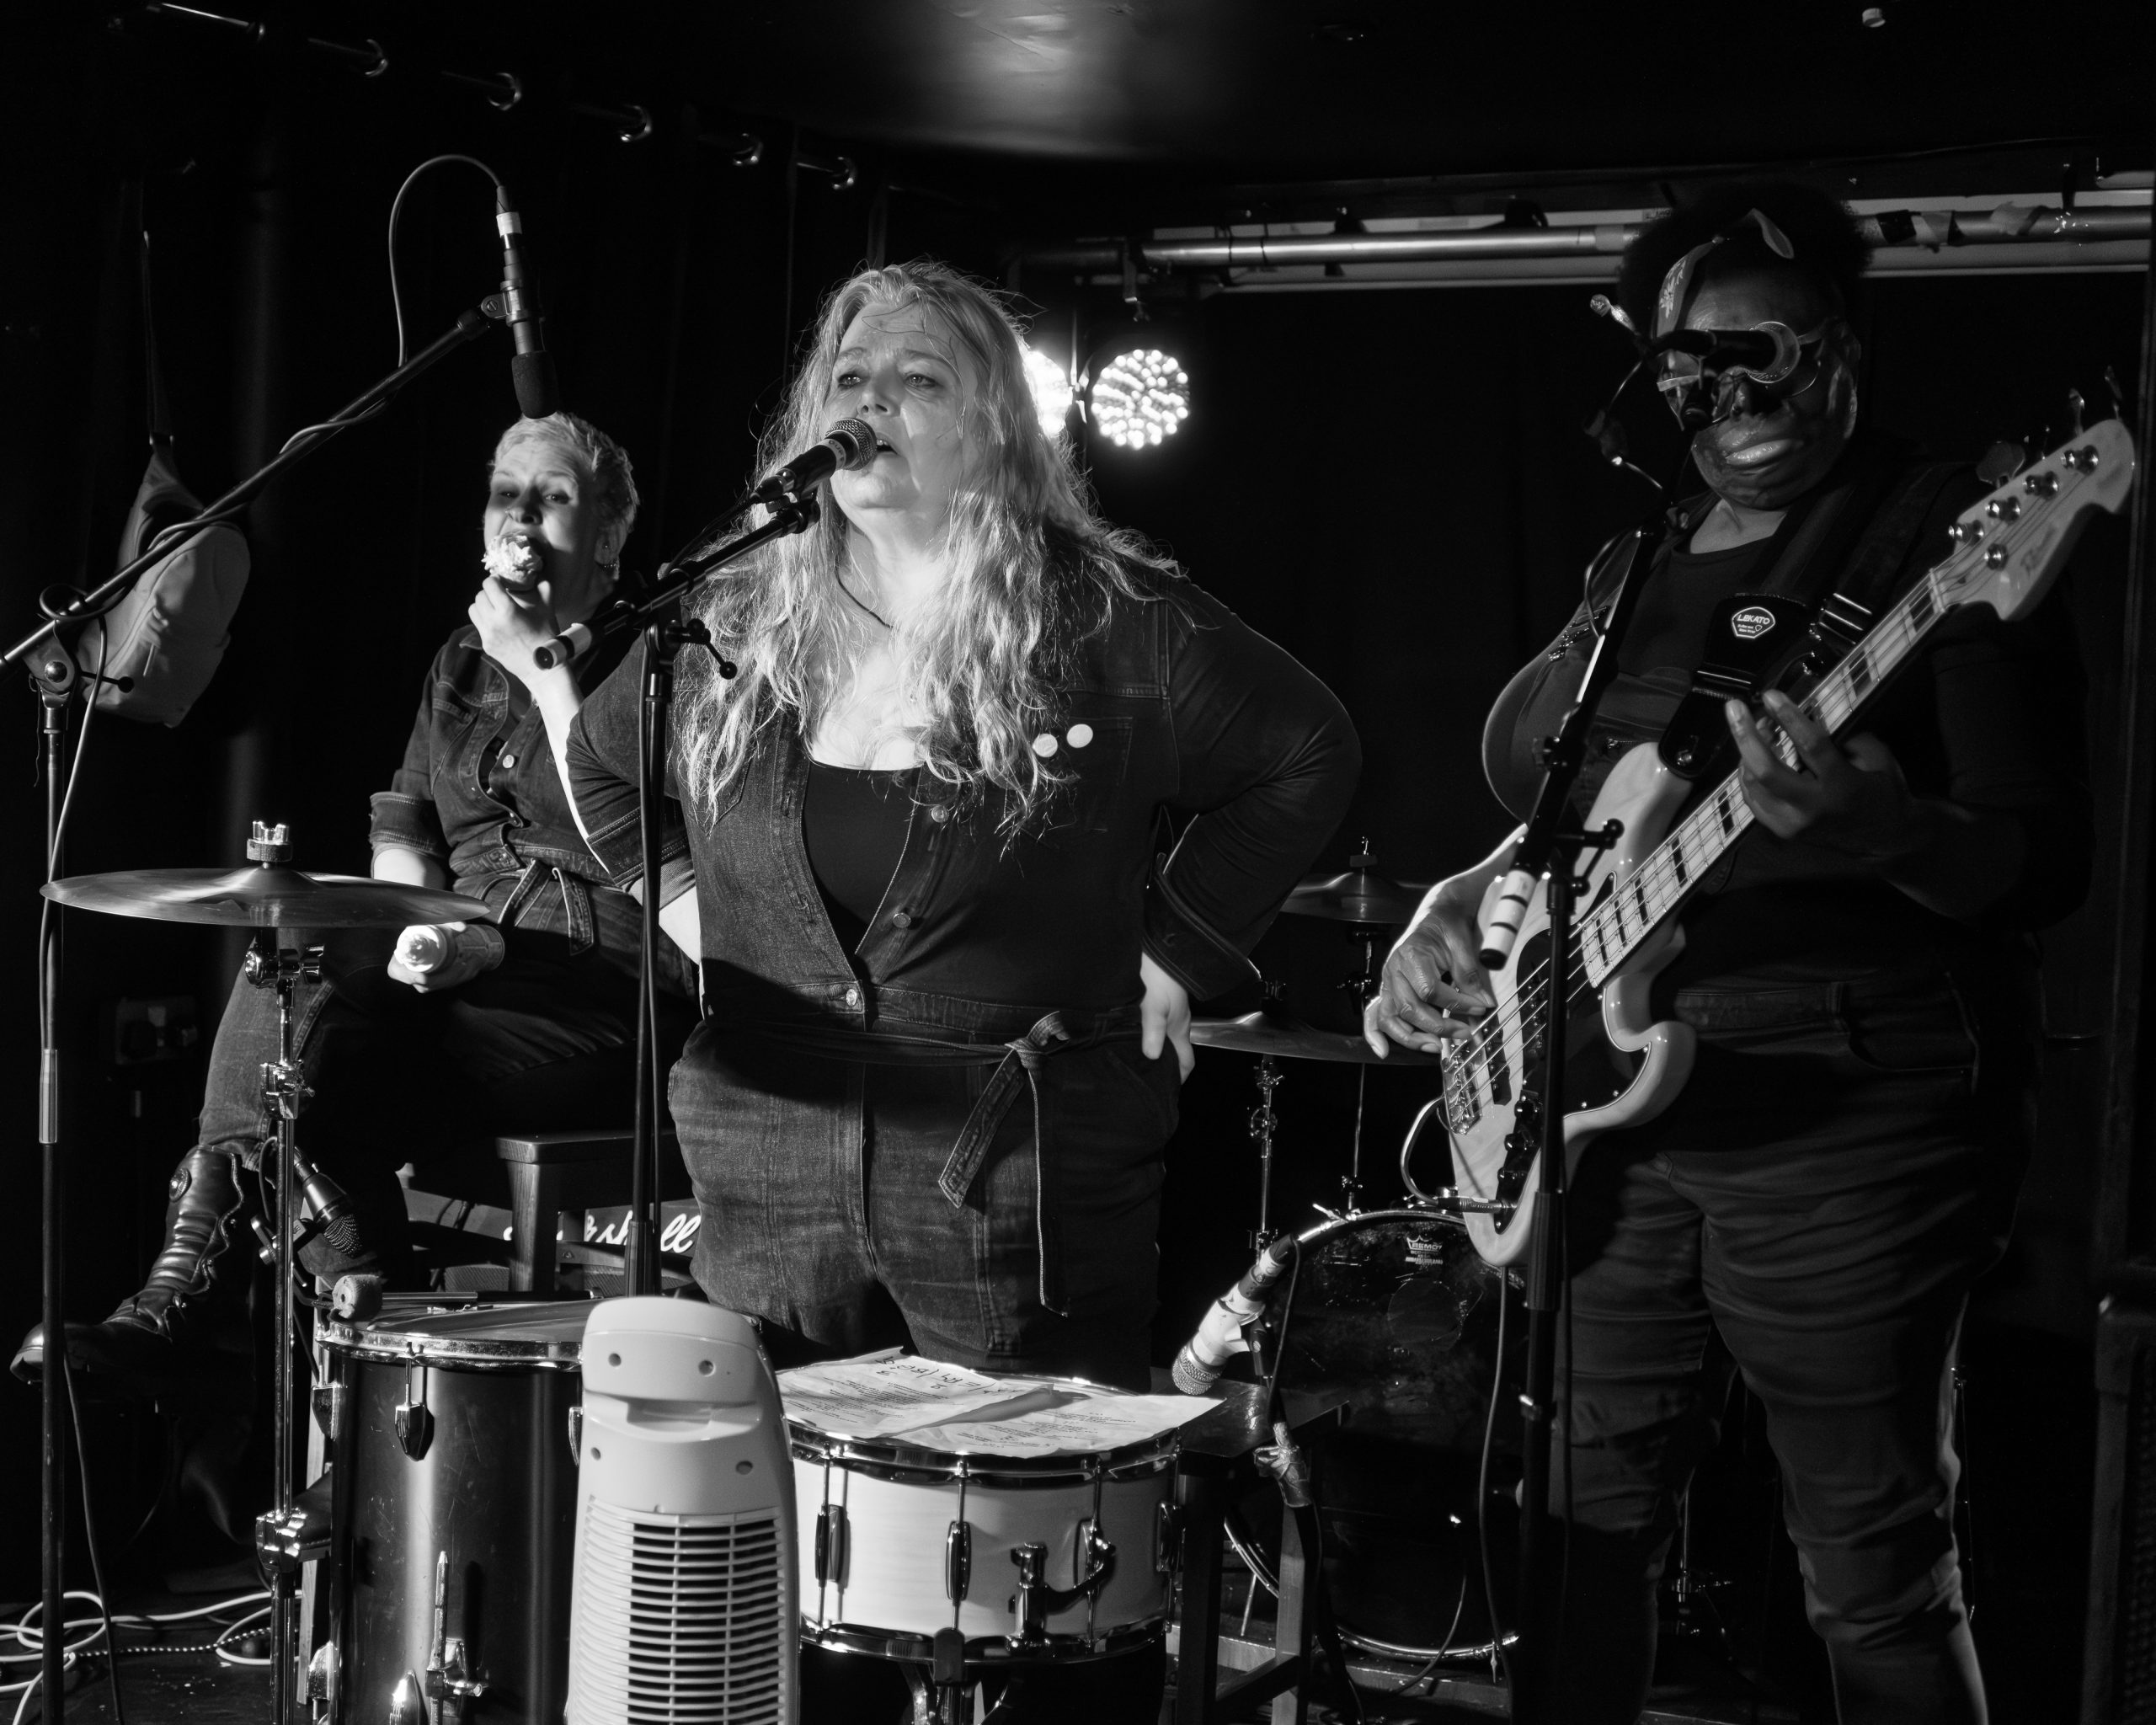
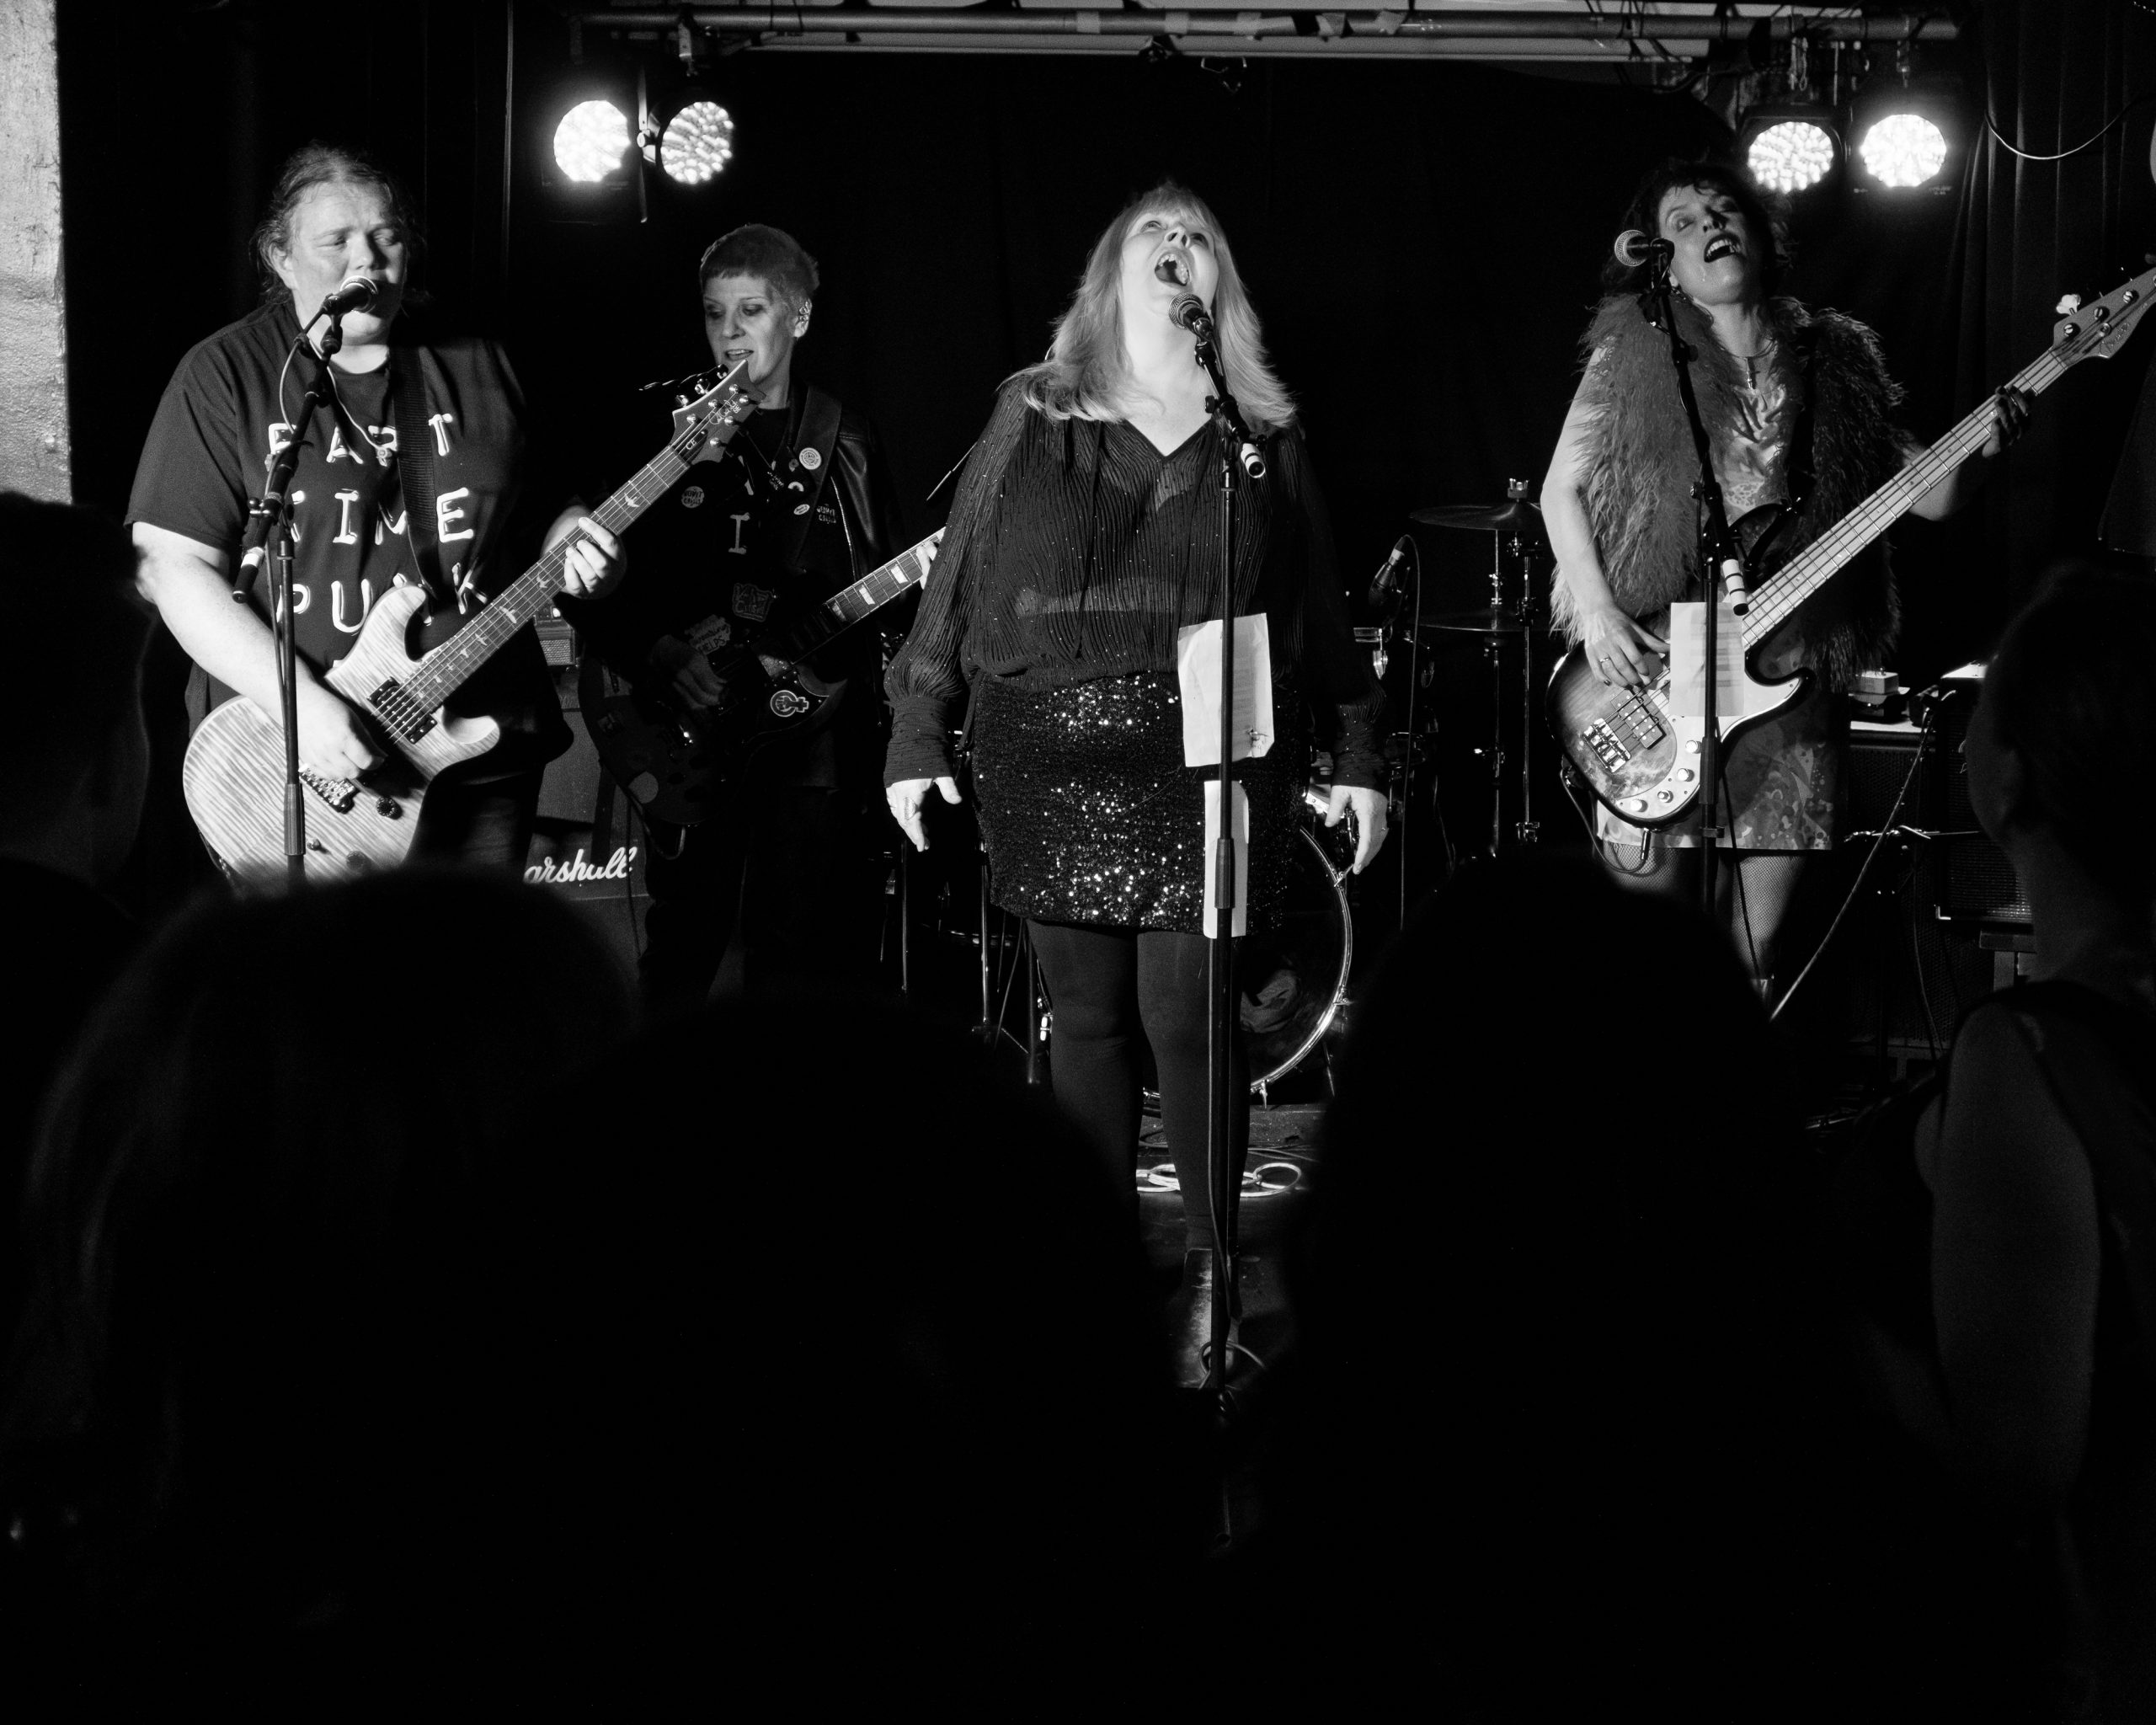
As this is hosted at one of my usual smaller music venues, I took my camera along and got a few shots of the artists performing that night: Boilerverse, JJ Lovegrove, Boilers, and Velvet Crisis. There had been an incident of double booking for the room, which meant that things got underway a bit later than normal, and, sadly, I had to cut my stay a bit short, so I was only there for maybe half of the Velvet Crisis set. But I had a great night, excellent music to enjoy, some lovely chats with people and of course, I enjoyed using my camera. I’ll share a few of my photos from the night below.
All photos taken using Fuji X-T5 along with the 56mm f1.2 and the 27mm f2.8.
Boilerverse performing at Up The Duffy’s Leicester, 14th December 2025.JJ Lovegrove performing at Up The Duffy’s Leicester, 14th December 2025.JJ Lovegrove performing at Up The Duffy’s Leicester, 14th December 2025.Boilers performing at Up The Duffy’s Leicester, 14th December 2025.Boilers performing at Up The Duffy’s Leicester, 14th December 2025. Yes, the cream cake eating by Barbe is all part of the performance.Velvet Crisis performing at Up The Duffy’s Leicester, 14th December 2025.
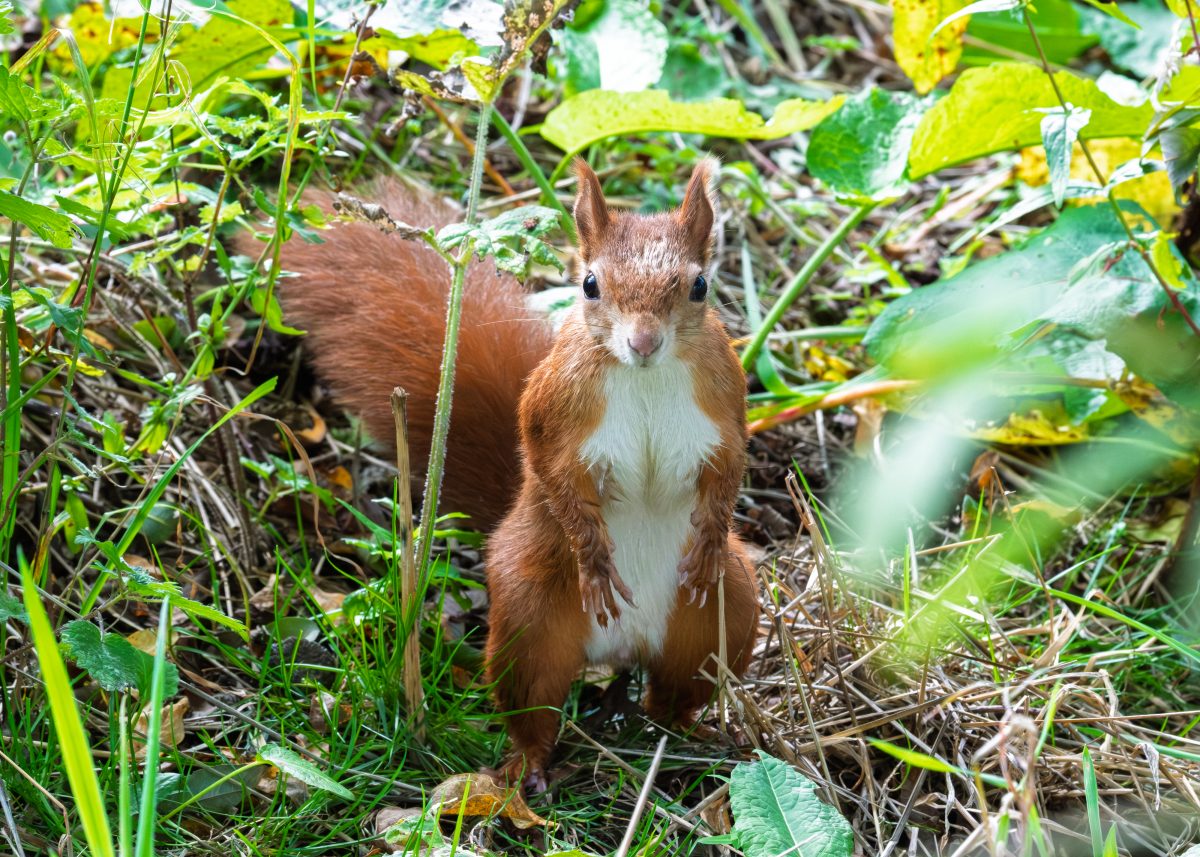
A red squirrel at Peak Wildlife Park. 1/1000th at f8, ISO 1600.
I had a very enjoyable visit to Peak Wildlife Park near Leek in Staffordshire today (24th September 2025). I had visited once before, about ten months ago and enjoyed it so much I knew I wanted to go back.
On that visit last year I had my first ever sighting of red squirrels. Ok, so they were in captivity but it was still a big thing for me. I’m 57 years old and despite lots of visits to areas of the UK where red squirrels can be seen in the wild, I hadn’t ever seen one until November 2024.
I managed to get one reasonable photo of a red squirrel during today’s visit, they were a bit less visible than during my last visit.
Before I go on to write much about my photography today, I just wanted to say how much I enjoyed Peak Wildlife Park. I’m not really a big fan of zoos. I don’t like seeing animals in cages. I know that conditions in many zoos have improved dramatically since my childhood and that many zoos do lots of good work to develop breeding programmes for endangered species etc. But still, I don’t like to see animals in cages. However, at Peak Wildlife Park the animals all seemed to be very well cared for. Additionally, I like the fact that the place is not too big. It’s easy to get around and see everything during one visit, something that is not so easy at larger zoos.
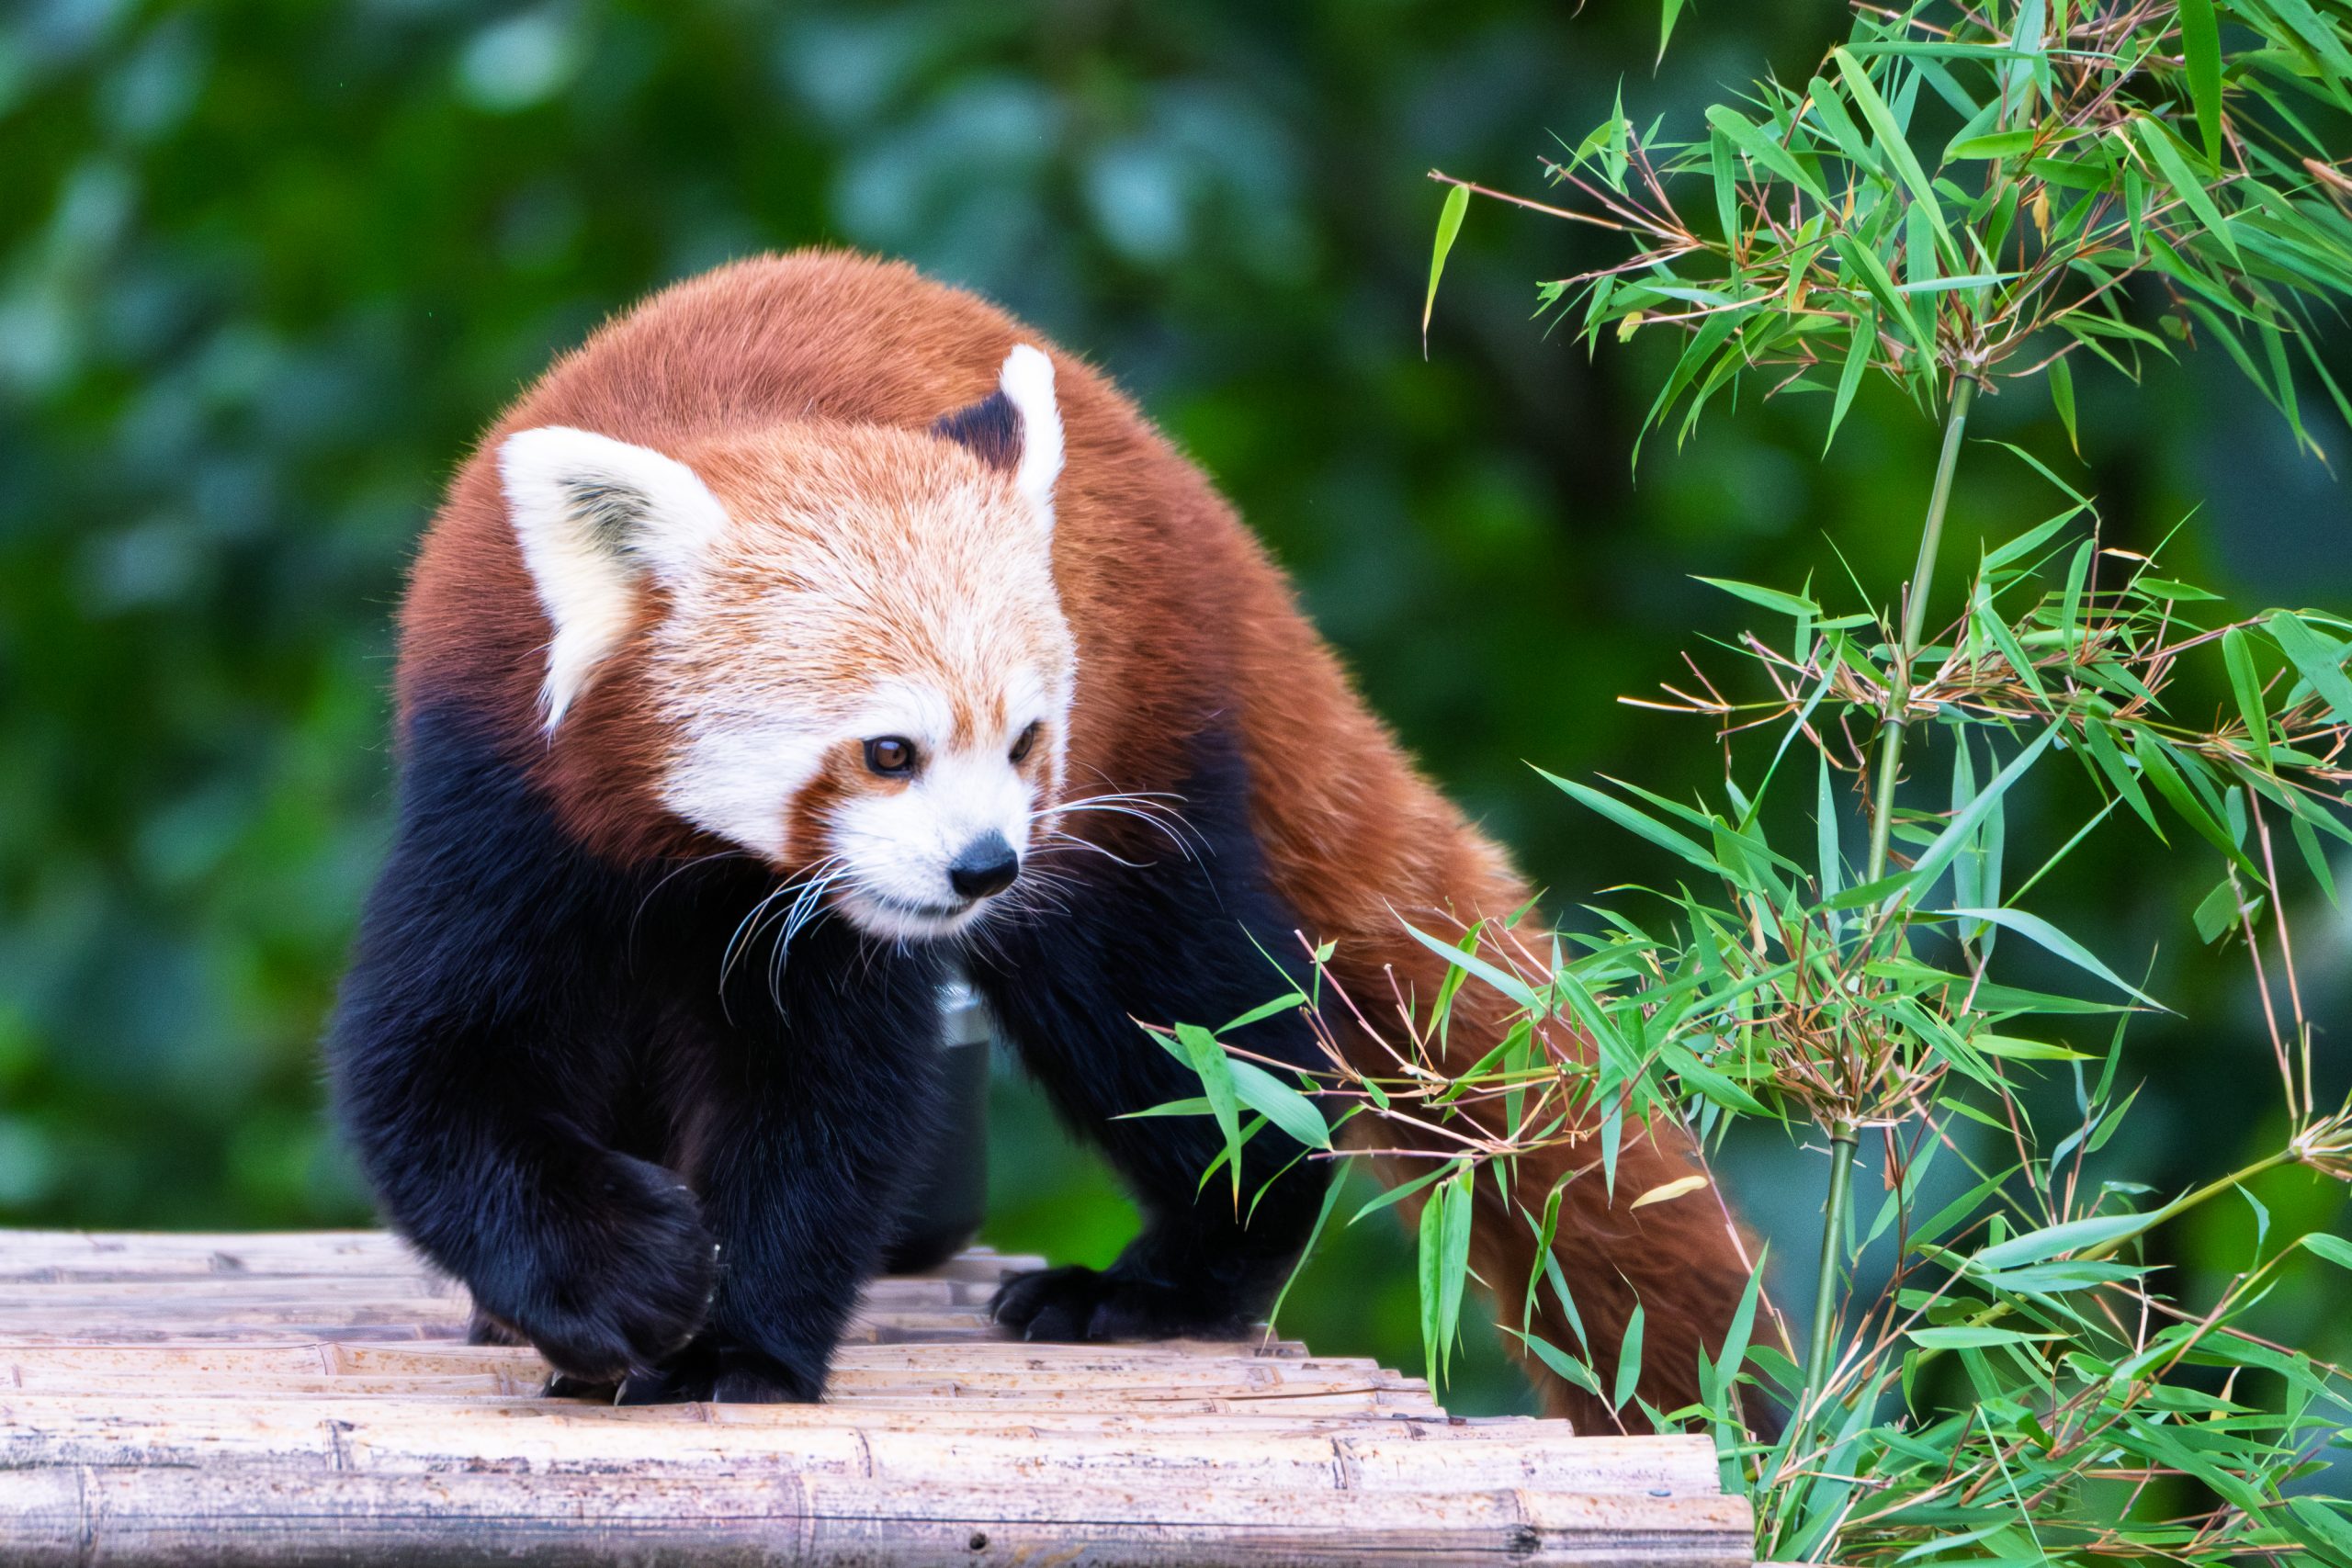
A red panda at Peak Wildlife Park. 1/1000th at f5.6, ISO 3200
I think that during previous visits to zoos and ‘wildlife parks’ I had often suffered from blurring caused by subject movement due to not having a high enough shutter speed. And the reason my shutter speed was too low was out of fear of using higher ISO. I deliberately went out today telling myself not to worry too much about ISO. As a result I was generally using a shutter speed of 1/1000th, sometimes 1/500th and I didn’t get any motion blur. I was using auto ISO and I have my camera set up with 3 different auto ISO brackets to cater for different lighting levels. All of them have the camera’s native ISO 125 as the lower limit and then I have ISO 800, ISO 1600 and ISO 3200 as the upper limits. I made use of all three settings as lighting conditions changed today.
Yes, there was some visible noise when viewing at 100% on my laptop, but noise reduction in post processing software has improved greatly, and does noise / grain really matter so very much anyway? Have I become too used to that ‘clean’ look of a digital photograph? Maybe it’s too clean?
I’ve been trying to worry less about high ISO during my recent gig photography too. Modern sensors, even APS-C and smaller, are so much better than they used to be. Plus, I think I’d rather see a bit of noise than unwanted motion blur.
I only used one lens today, my 100-400mm which offers a field of view roughly the same as a 150-600mm lens would with a 35mm sensor.
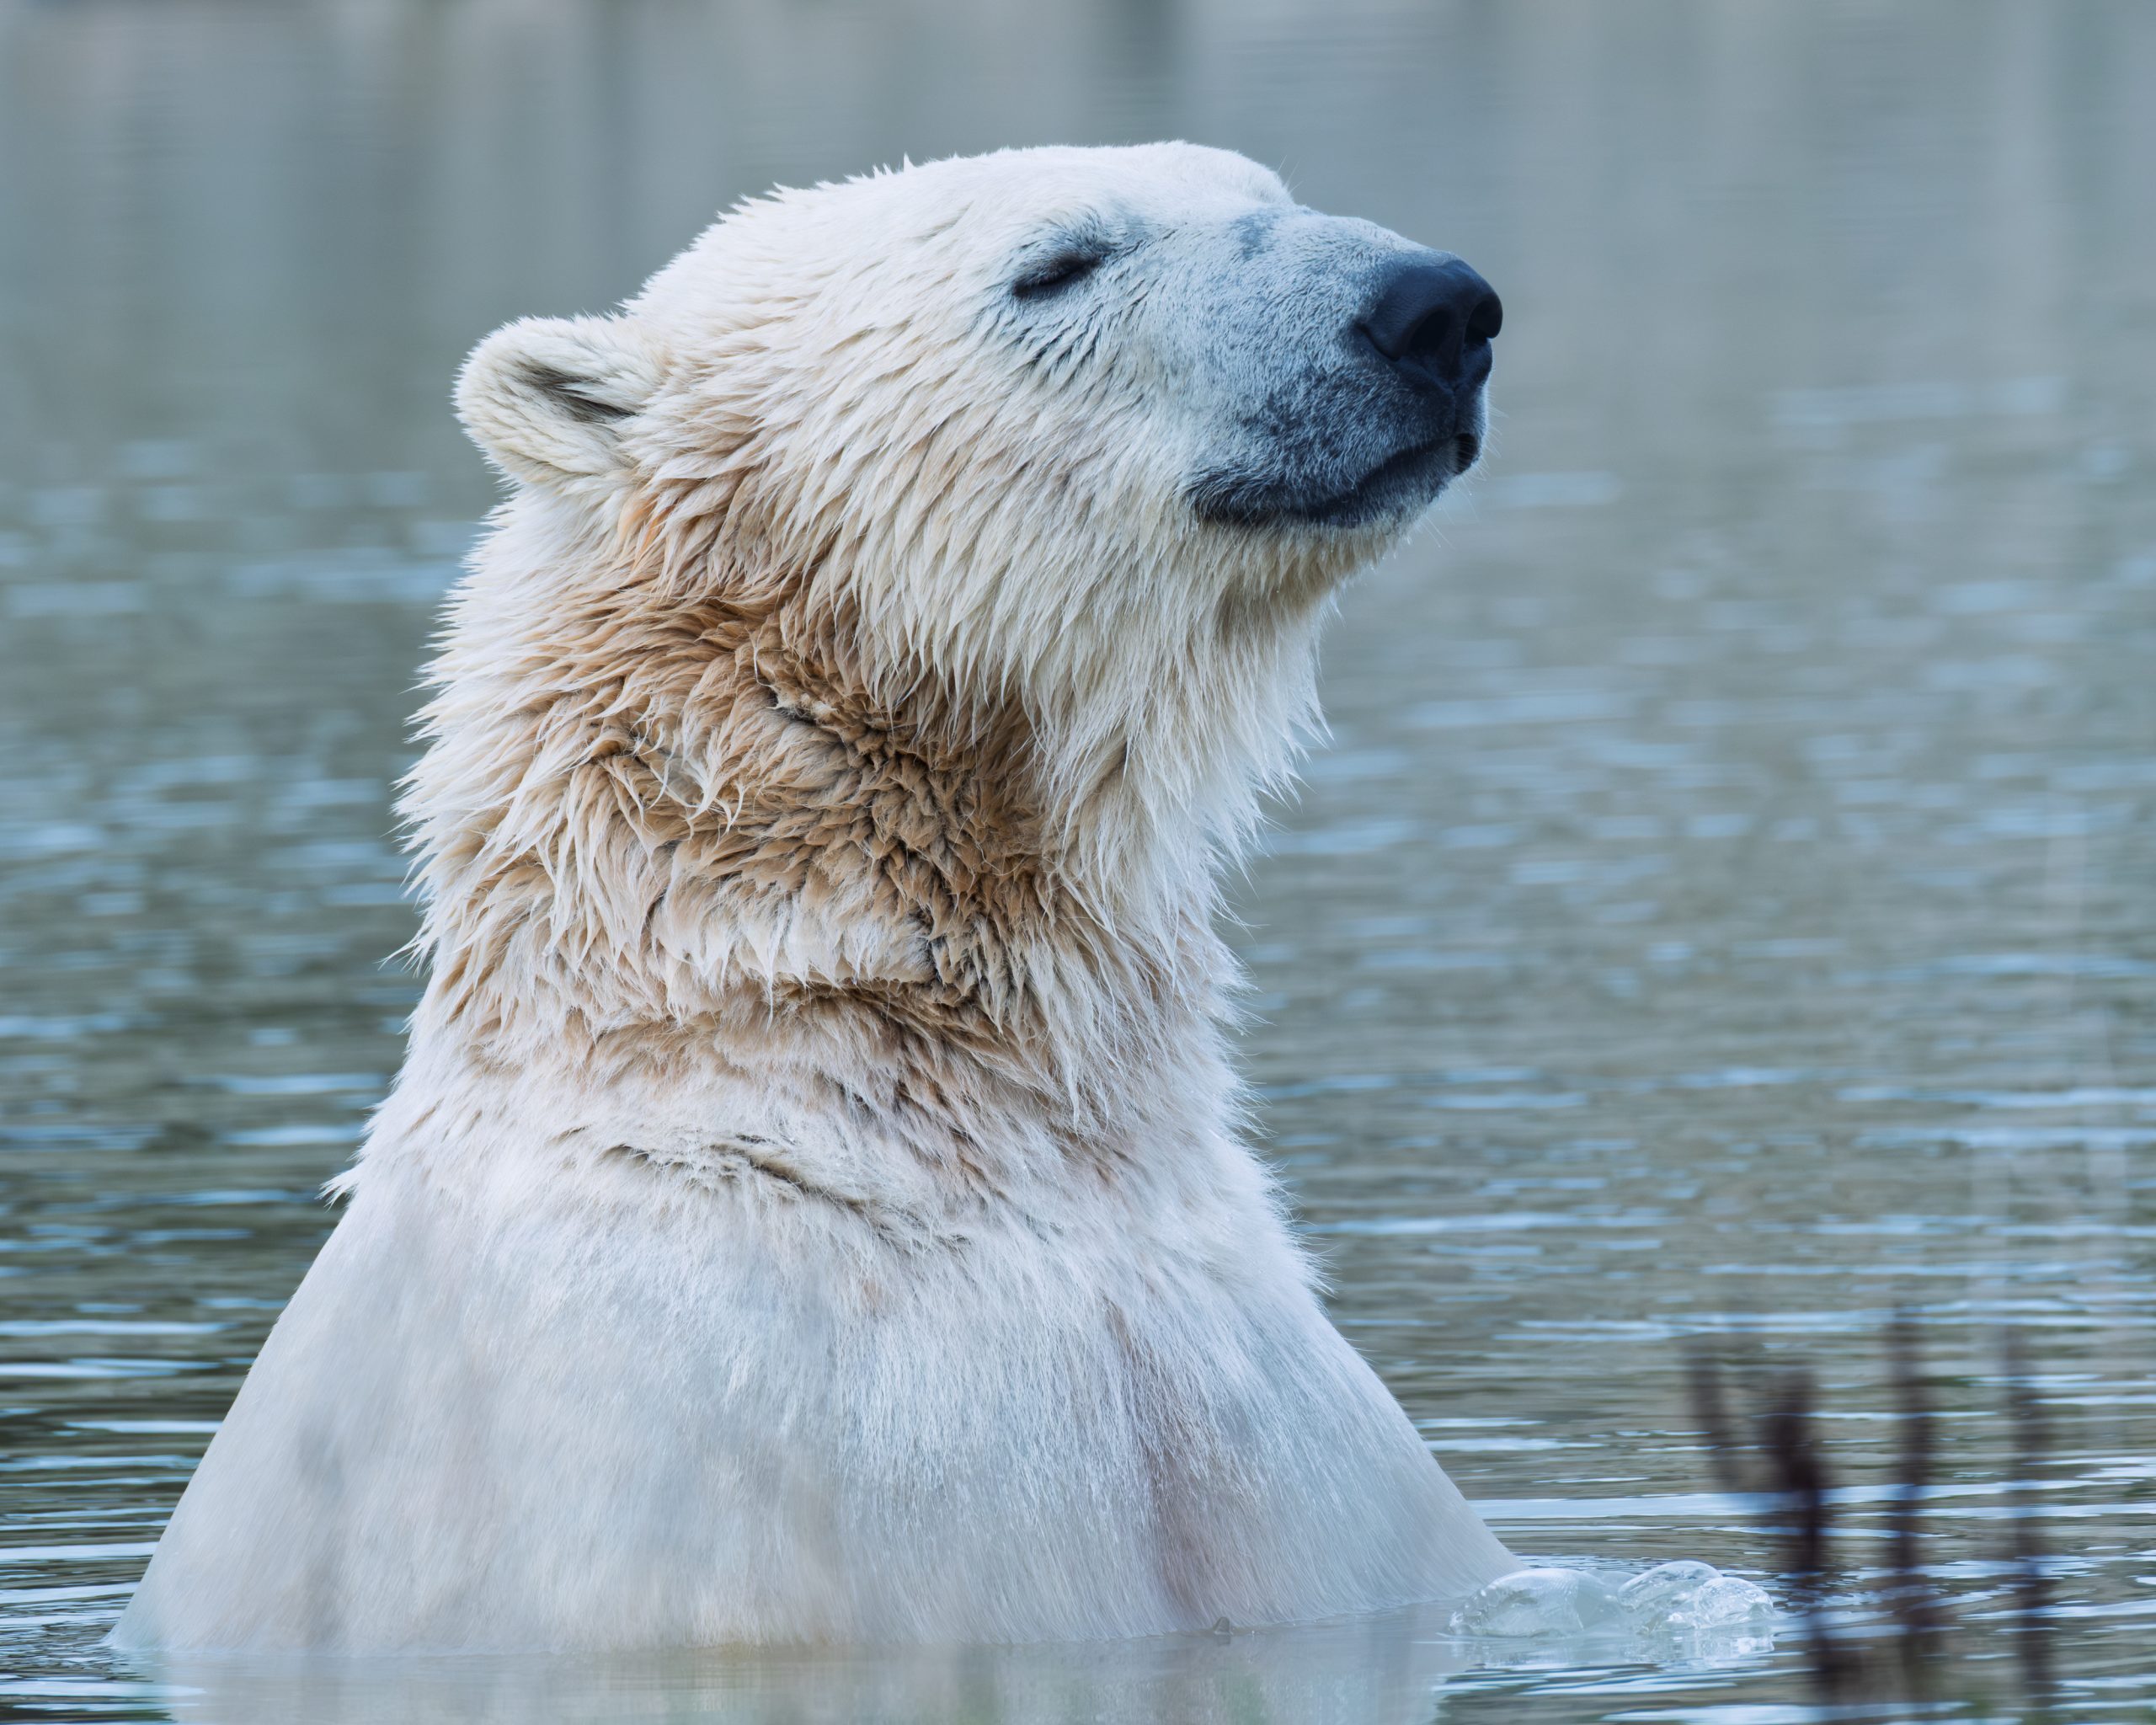
A polar bear at Peak Wildlife Park. 1/1000th at f8, ISO 800
It has been over a year since I wrote anything here. I’ve taken a bit of a break from blogging, but I have still been fairly active with my photography.
Why the break?
A couple of weeks after my previous post here, I suffered another bereavement. Much time was spent doing the Things That Need To Be Done. Death certificates, funeral arrangements, solicitors, house clearing…
And I seemed to jump straight from that to happier things – my sister’s wedding and my daughter’s graduation from University of Nottingham. Both happy events tinged with pangs of loss.
My sister and my new brother-in-law asked me to be their wedding photographer. It’s a role I’m always nervous of and I’ve only “officially” shot weddings on a handful of occasions. It was at a beautiful location in Scotland, Eilean Donan Castle. But a beautiful location held its photographic hazards. A big, high roofed, medieval great hall – stunning!
I knew I would need to use flash, but I didn’t get a chance to look at the room before the ceremony. I had a little “soft box” attachment for my flash but that caused too much light loss in this setting. The ceiling was a high timber raftered affair, not suitable for bouncing off. I just had to shoot with full on direct flash which led to lots of nasty glare and reflections. This in turn led to way too much work in post to try and remove or reduce the glare. Had I been able to spend a bit of time in the room before the ceremony I might have been able to find a happy balance of ISO and flash strength. However, a fantastic day.
JJ Lovegrove performing at the final Soundhive Social gig, Duffy’s Bar, Leicester. 12th December 2024.
I’ve also done quite a bit in the way of “shooting musicians”. Quite a few gigs in small venues which I’ve enjoyed tremendously. I also did another promo shoot for Bellatones, I won’t share any of the photos from that shoot here as I view them as their property to share as they wish (or not).
Meanwhile I have been working on a photography project which I started thinking about very nearly a year ago. It will be a collection of ten photographs inspired by music from a favourite album. I have a few photos still to take, but I do have plans in place for each photo. I just need to get out and shoot them.
One of these photos involved three or four trips out to the planned location. I would get home, look at what I’d shot and then think of improvements and additional props that would add to the finished result. The residents of the little village I was shooting in must have been getting curious about why this strange bloke kept showing up with his camera and tripod and doing weird things on their main street. You’ll get to see just how weird this must have looked when I finally finish the project and publish the photos. I’m not going to publish any of the photos until I have them all “in the can” but then I will publish one at a time here.
View whilst ascending Moun t Blue Sky, Colorado, looking down towards Echo Lake.
I also enjoyed a trip to Colorado to visit my late wife’s family there. This would have been lovely and a great photo opportunity but for one thing. I had managed to totally evade Covid-19 for four and a half years. I had been ultra careful about it because I had been doing a lot of caring duties for my dad and I really didn’t want to pass anything like that on to him. However, passing through Heathrow and sitting on a direct flight to Denver finally defeated me. I started to feel rough after a couple of days and tested positive on the third day – not before I’d passed it on to the whole family over there. I had no clue I was ill until the evening of the second day and even then, I just thought I had a sore throat.
We did manage to extend the visit by an extra week, but I spent two whole weeks just sitting out on the porch, listening to music and watching the hummingbirds (which I spectacularly failed to photograph – they’re very small and very fast). I felt so very guilty about passing this nasty virus on to everybody over there. Lots of plans had to be cancelled but I was very lucky and did manage to get back up Mount Blue Sky (formerly Mount Evans) which was a real highlight of the trip for me. It’s a place my late wife loved and yeah, I’m sure you can imagine the importance to me of getting up there again.
Oak tree in January at Bradgate Park, Leicestershire.
I need to get out into nature more. I watch several photography channels on YouTube and I think the one I have gained most from is by Kim Grant. I love her mindful approach to photography, making sure that you take the time to properly engage with your surroundings when out with your camera. Her channel makes a refreshing change from all those channels that are more focussed on equipment or the technical aspects of photography.
So, I’m back and will be trying to embrace Kim’s approach more often. Hopefully it won’t be another year before I post here again!
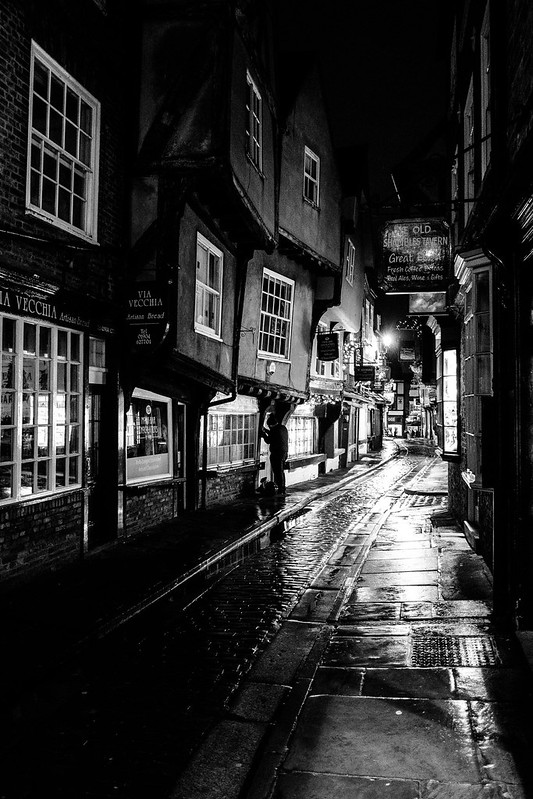
Coffee Yard at night. York, November 2017. Fujifilm X-Pro2, Fujinon 18mm f2.
Following my previous post here I realised that I hadn’t posted anything since September and that towards the end of the post I said that I needed to get out and shoot more.
It’s not that I haven’t been getting out to shoot at all, more that I’ve not been particularly excited by my results. Much of the time it’s the same old places that I’ve visited how many times before and I’m finding nothing new to see, not feeling inspired.
Also maybe I just need to blog about my photography more, even if I’m not doing anything fantastic.
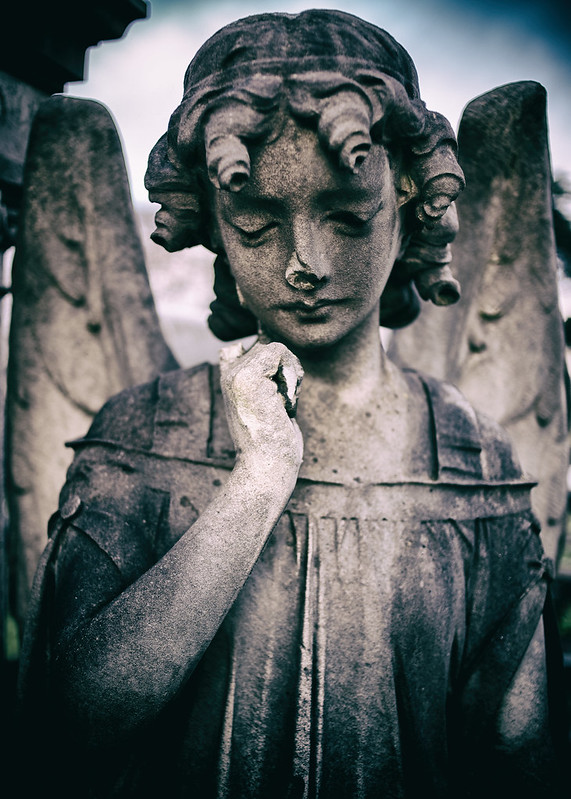
I’ve been a paying member of Flickr for a very long time now and I barely use it these days. Every now and again I realise that I’ve not uploaded any photos there for a while so I add a few but I increasingly wonder why. I find it’s rare that I obtain any kind of useful feedback there. Maybe it would be better to put extra effort into my blogging instead? As a case in point I recently once again had a photo featured in “Explore” and the views and favourites went ballistic on that photo for a couple of days. I really don’t know why. It was one of my regular shots of my favourite angel at Welford Road Cemetery. I’ve taken an awful lot of very similar shots and I would also say an awful lot of much better shots, so why this one? It really wasn’t anything special (below).
I did enjoy a few days in York during November and in particular was drawn to shooting the narrow lanes and alleys after dark. I felt these scenes were quite striking when the cobbles were wet, reflecting more light into the street. I think I need to do more night time street photography.
I also spent quite a bit of time messing around with long exposures during the autumn but I’ve yet to shoot anything that I’m particularly pleased with. I think I still have a lot to learn about which scenes make the most compelling long exposures.
After not shooting with my Canon kit for a good 18 months to two years I have tried to take it out and about with me recently. On the whole I found it a reminder of why I’d not really used it for so long. Yes, it’s bigger and heavier than my Fuji kit but there are other aspects which make me prefer shooting with the Fuji bodies. Shooting with a DSLR again I found that I really missed the “live preview” of the Fuji viewfinder. Yes, I know I could pop the DSLR into “live view” but I generally don’t like composing a photo on the screen (sometimes I will use that method if the camera is on a tripod, but never hand held). Having a live view of the final exposure is something I’ve got very used to and I think it’s particularly useful when shooting under more tricky lighting conditions.
And that is about where I am with my photography as we head into 2018. I want to play more with long exposures and I want to spend more time shooting with a single body and lens. During my recent trip to York the Fujinon 18mm was pretty well a permanent feature on my X-Pro2 and I think I enjoyed myself all the more as I wasn’t always thinking about which lens to use.
I’ve recently invested in some new computer kit and changed the way I work with my photos in Adobe Lightroom.
I built myself a new tower PC a couple of years ago and that has been my “digital darkroom” ever since. It’s powerful enough for my needs with an i7 processor, a reasonable wedge of memory and fast PCIe connected SSD. However using it means shutting myself away in my “den”. Sometimes that’s fine, other times I’d like to be able to work in the living room, at the kitchen table or for that matter in a hotel room.
I did have a laptop with Lightroom installed on it but it was a separate catalog. If I imported my photos on the laptop to work on them I would then later export those photos and import them back to my main catalog on the desktop machine. This worked, but it was a more laborious process than I wanted so I didn’t work that way very often.
I explored the idea of storing my Lightroom catalog and more recent photos on a USB hard disk. This worked pretty well. I had for a long time held archives of photos from previous years on a NAS so that they could be accessed by multiple devices, albeit rather more slowly than anything which was held on local storage. With my catalog and recent photos on an external drive I could now swap between the desktop machine and the laptop and just carry on working from where I was before – same photos, same edits, same presets available. As long as I’m at home then my full archive of photos is available on the NAS device. If I’m away from home, working on the laptop then all I’ll have is my recent photos.
Although this solution worked it could feel a bit sluggish. This was only to be expected with storing the Lightroom catalog files and the photos on a USB hard drive. Transfer speeds of around 100MB per second don’t match up to the sort of speeds obtained from an internal PCIe attached SSD. However with an external USB SSD that 100MB per second could be increased to something more like 500MB per second and with Christmas coming around I had gift money to spend so I invested in a Samsung T5 250GB external SSD. I had to further reduce the number of photos I kept on this drive so that now everything but the last 3 or 4 months worth of shooting is on the NAS but the extra speed when working with current photos was worth it.
In addition to being roughly five times faster, the Samsung T5 is much smaller and lighter than a conventional USB hard drive. This coupled with a 13.3″ laptop and my Fujifilm X series cameras makes for a really very small and light travelling kit compared with what I would have had to take with me previously.
Due to the obviously very portable nature of a laptop and small, light external storage I feel that encryption is very important. If I lose the laptop or it’s stolen then I want to make sure that the most important asset, the data, is protected. The SSD internal to the laptop is encrypted using BitLocker provided by Windows 10 Pro and the external T5 SSD comes with its own encryption solution. Of course I also protect my data by having multiple backups with at least one copy being held off-site at all times.
All of this is great and it enables me to work with my photos the way I want to but now of course I need to get out with a camera and take more photos! I don’t really “do” New Year resolutions but if I did they would have to include getting out more, taking more photos and blogging more frequently.
If you like your photos nice and sharp and don’t like blur or softness then this might possibly not be the blog post for you. You have been warned.
With World Pinhole Photography Day approaching and seeing as how my previous post was all about feeling like I was stuck in a rut, I thought it might be an idea to make a pinhole to use with my Fuji bodies. It would be fun to do the make and having a pinhole to shoot with would offer some extra creative possibilities. I’d never made one before so it would be a fun learning experience too.
As I predominantly shoot using Fuji X Series cameras these days I decided to make the pinhole to fit my Fuji interchangeable lens bodies.
A pinhole is just that – a small hole through which the light enters the camera. There’s no means to adjust the focus and the aperture is determined simply by how large or small you make the pinhole. It’s very primitive stuff but there’s often a great satisfaction to using simple methods.
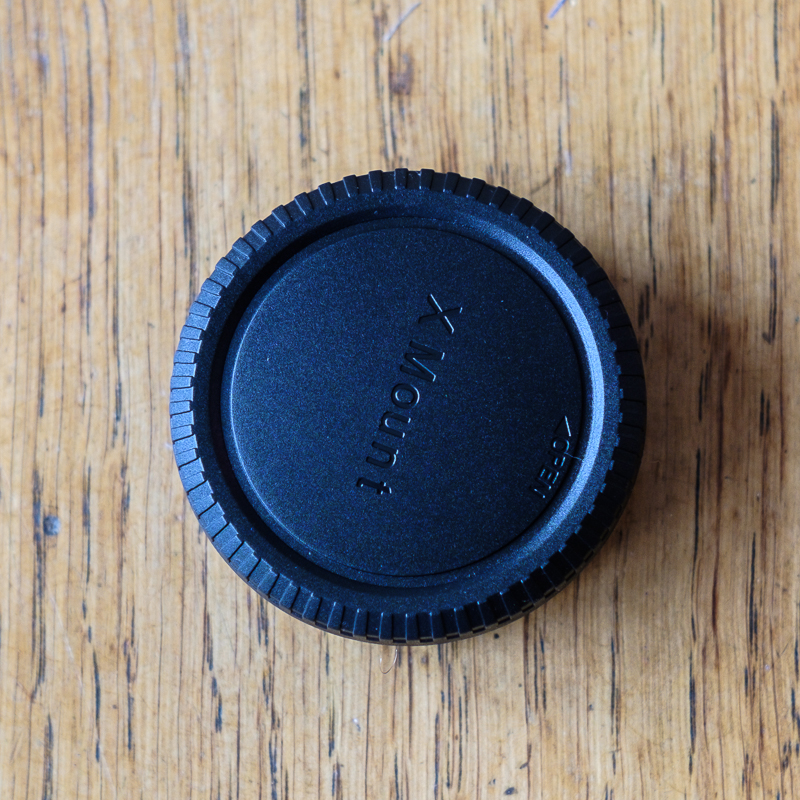
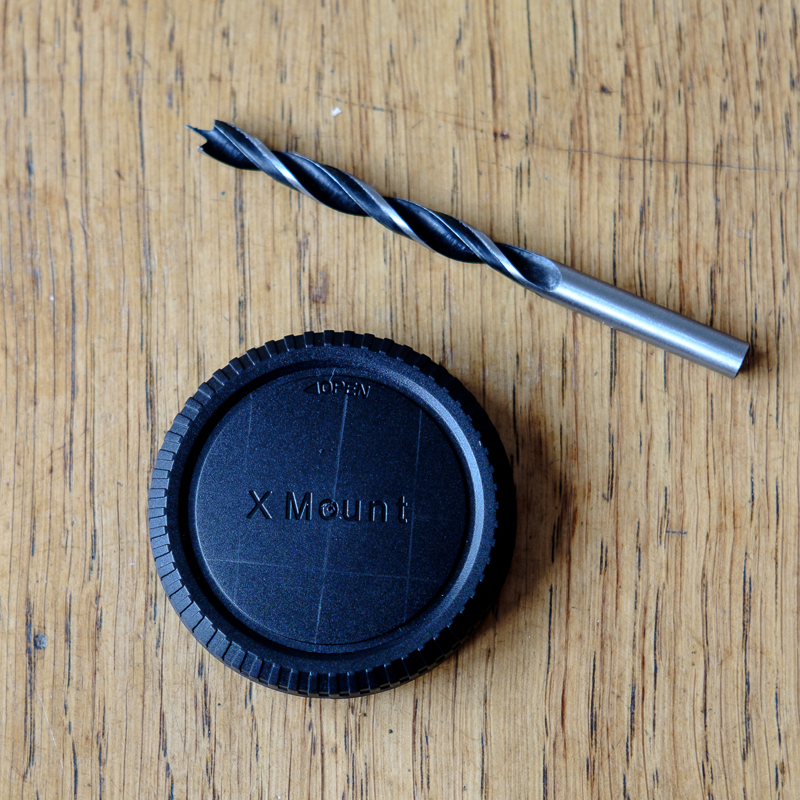
I decided I would make my pinhole using a spare body cap. I didn’t want to mess up an original Fuji supplied cap so I bought a cheap third party one from Amazon. It came as a set of body cap and rear lens cap for £3.99 including delivery.
Fuji X Mount body cap.
I was expecting to have to wait a few more days for delivery but the caps arrived way sooner than expected on Saturday morning (today as I write) meaning I had the free time to get on with this little project.
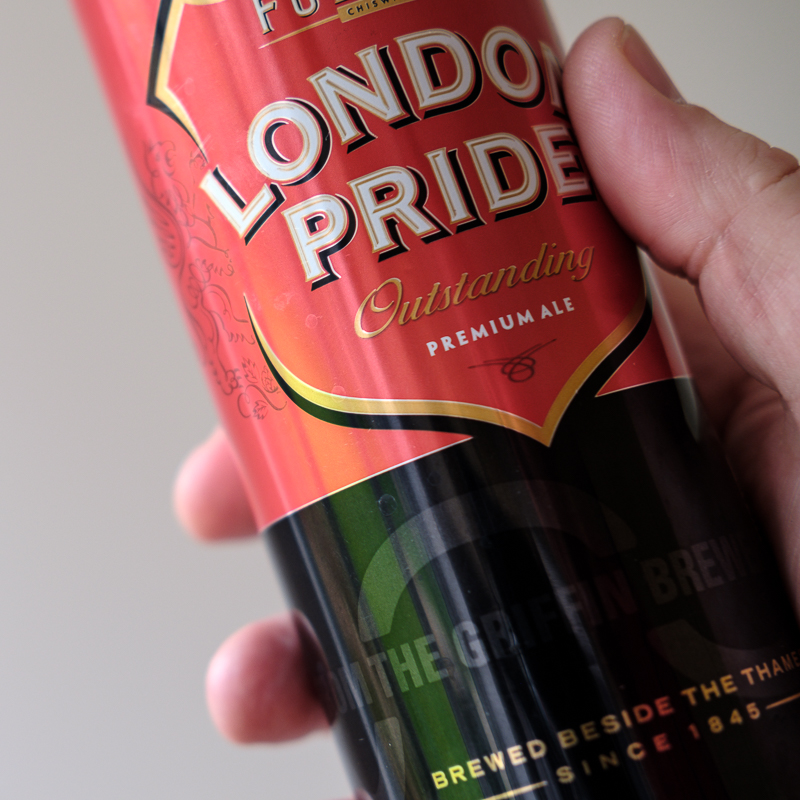
The first thing I did was to drink some beer!
Beer!
This is usually a good idea anyway of course but I needed some metal that would be easy to work. The aluminium of a drinks can would be ideal. I will grudgingly admit that you can scrape by with using a soft drink can but the best results will always be obtained from a beer can… 😉
Having drank my beer and rinsed out the can I used a can opener to take off the top end and then a pair of scissors were employed to snip out a panel from the can. Looking at the interior space of my specially acquired body cap I thought a roughly 2cm square of the metal would do the trick.
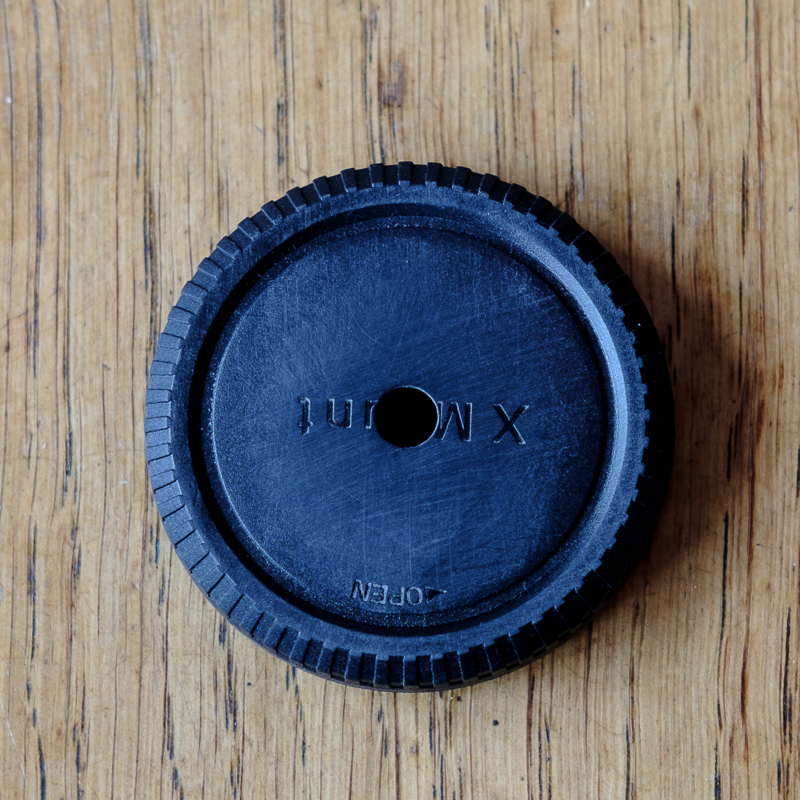
The next thing I needed to do was to find the centre of the body cap as I would need to drill a hole through it. I marked out three chords over the circle and then drawing lines at 90 degrees from the middle of each I marked the centre of the body cap. You may want to look up a proper explanation of this method of finding the centre of a circle if you want to have a go at this yourself. I don’t think I did a very good job of it.
Marking the centre, ready tp drill a hole.
I used a 6mm drill bit and it was handy to have one with a point on it like this as I could use that to poke a small centre point hole before I actually drilled the main hole. Once the hole was made I used some 600 grit “wet and dry” paper to smooth the edges of the hole leaving something looking like this :-
6mm hole drilled through the body cap.
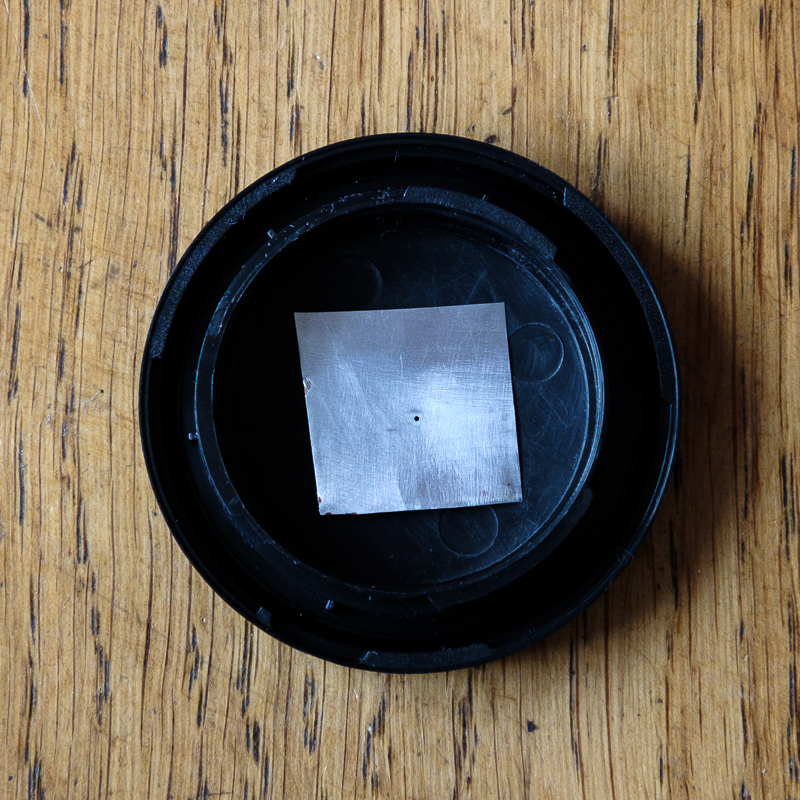
The next task was to make the actual pinhole through the square of aluminium taken from the beer can. I held a needle using a pair of pliers and pushed down through the metal. I had read that it’s best not to poke a hole right the way through but just push down enough to make a dimple and then sand the dimple down to form the actual hole. I guess I pushed down too hard and made an actual hole. Oh well, nothing about pinholes is really an exact science so I decided to go with it. I then used the 600 grit wet and dry paper again to sand down both sides of the aluminium. Once I was satisfied it was all smooth I washed it under the tap and then used some rubbing alcohol to make sure that everything was really clean.
Pinhole made, sanded and cleaned.
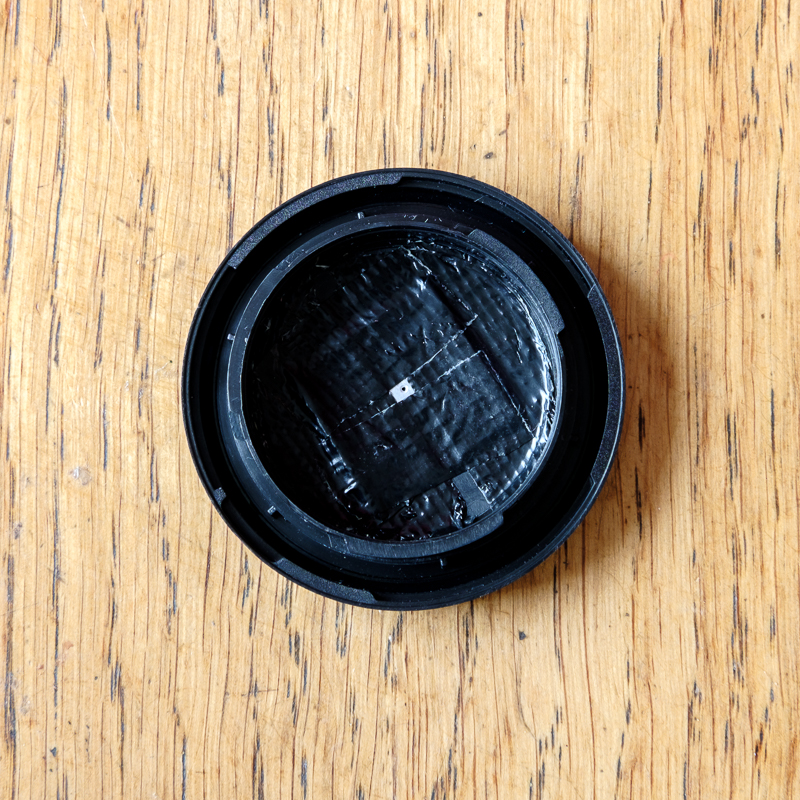
Next I used some gaffer tape to secure the aluminium within the body cap, ensuring that the pinhole was positioned at the centre of the larger hole in the body cap. The end result is shown below :-
Pinhole taped into place.
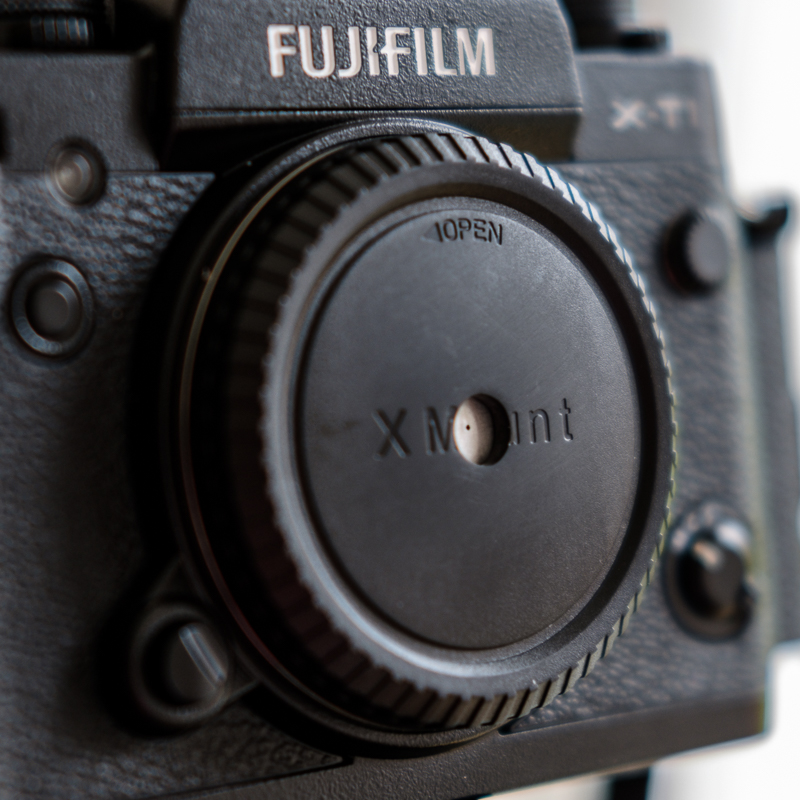
I might want to paint that little bit of uncovered aluminium with some black paint to stop light bouncing around too much but this will do for now. Pinholes are all about serendipity so a bit of bouncing light doesn’t bother me too much. The pinhole is shown mounted on my X-T1 at the top of this post.
Having spent maybe 45 minutes to an hour making the pinhole this afternoon I wanted to pop out and try shooting with it. I took my tripod as the pinhole creates really quite a small aperture and I was sure that the end results would be blurry enough without adding camera shake to the equation. I was right on that score. The photos I took were quite a bit softer than I expected. I think maybe I need to try to make a smaller hole. Buy hey, this is all part of the fun and if I want to put a different pinhole into the body cap then it won’t be too difficult as it’s only taped into place.
I decided to go with the flow and edited this photo in Analog Efex to add some “distressing” – dust, dirt and a wet-plate look. When I feel like having another go I’ll see if I can make a smaller pinhole.
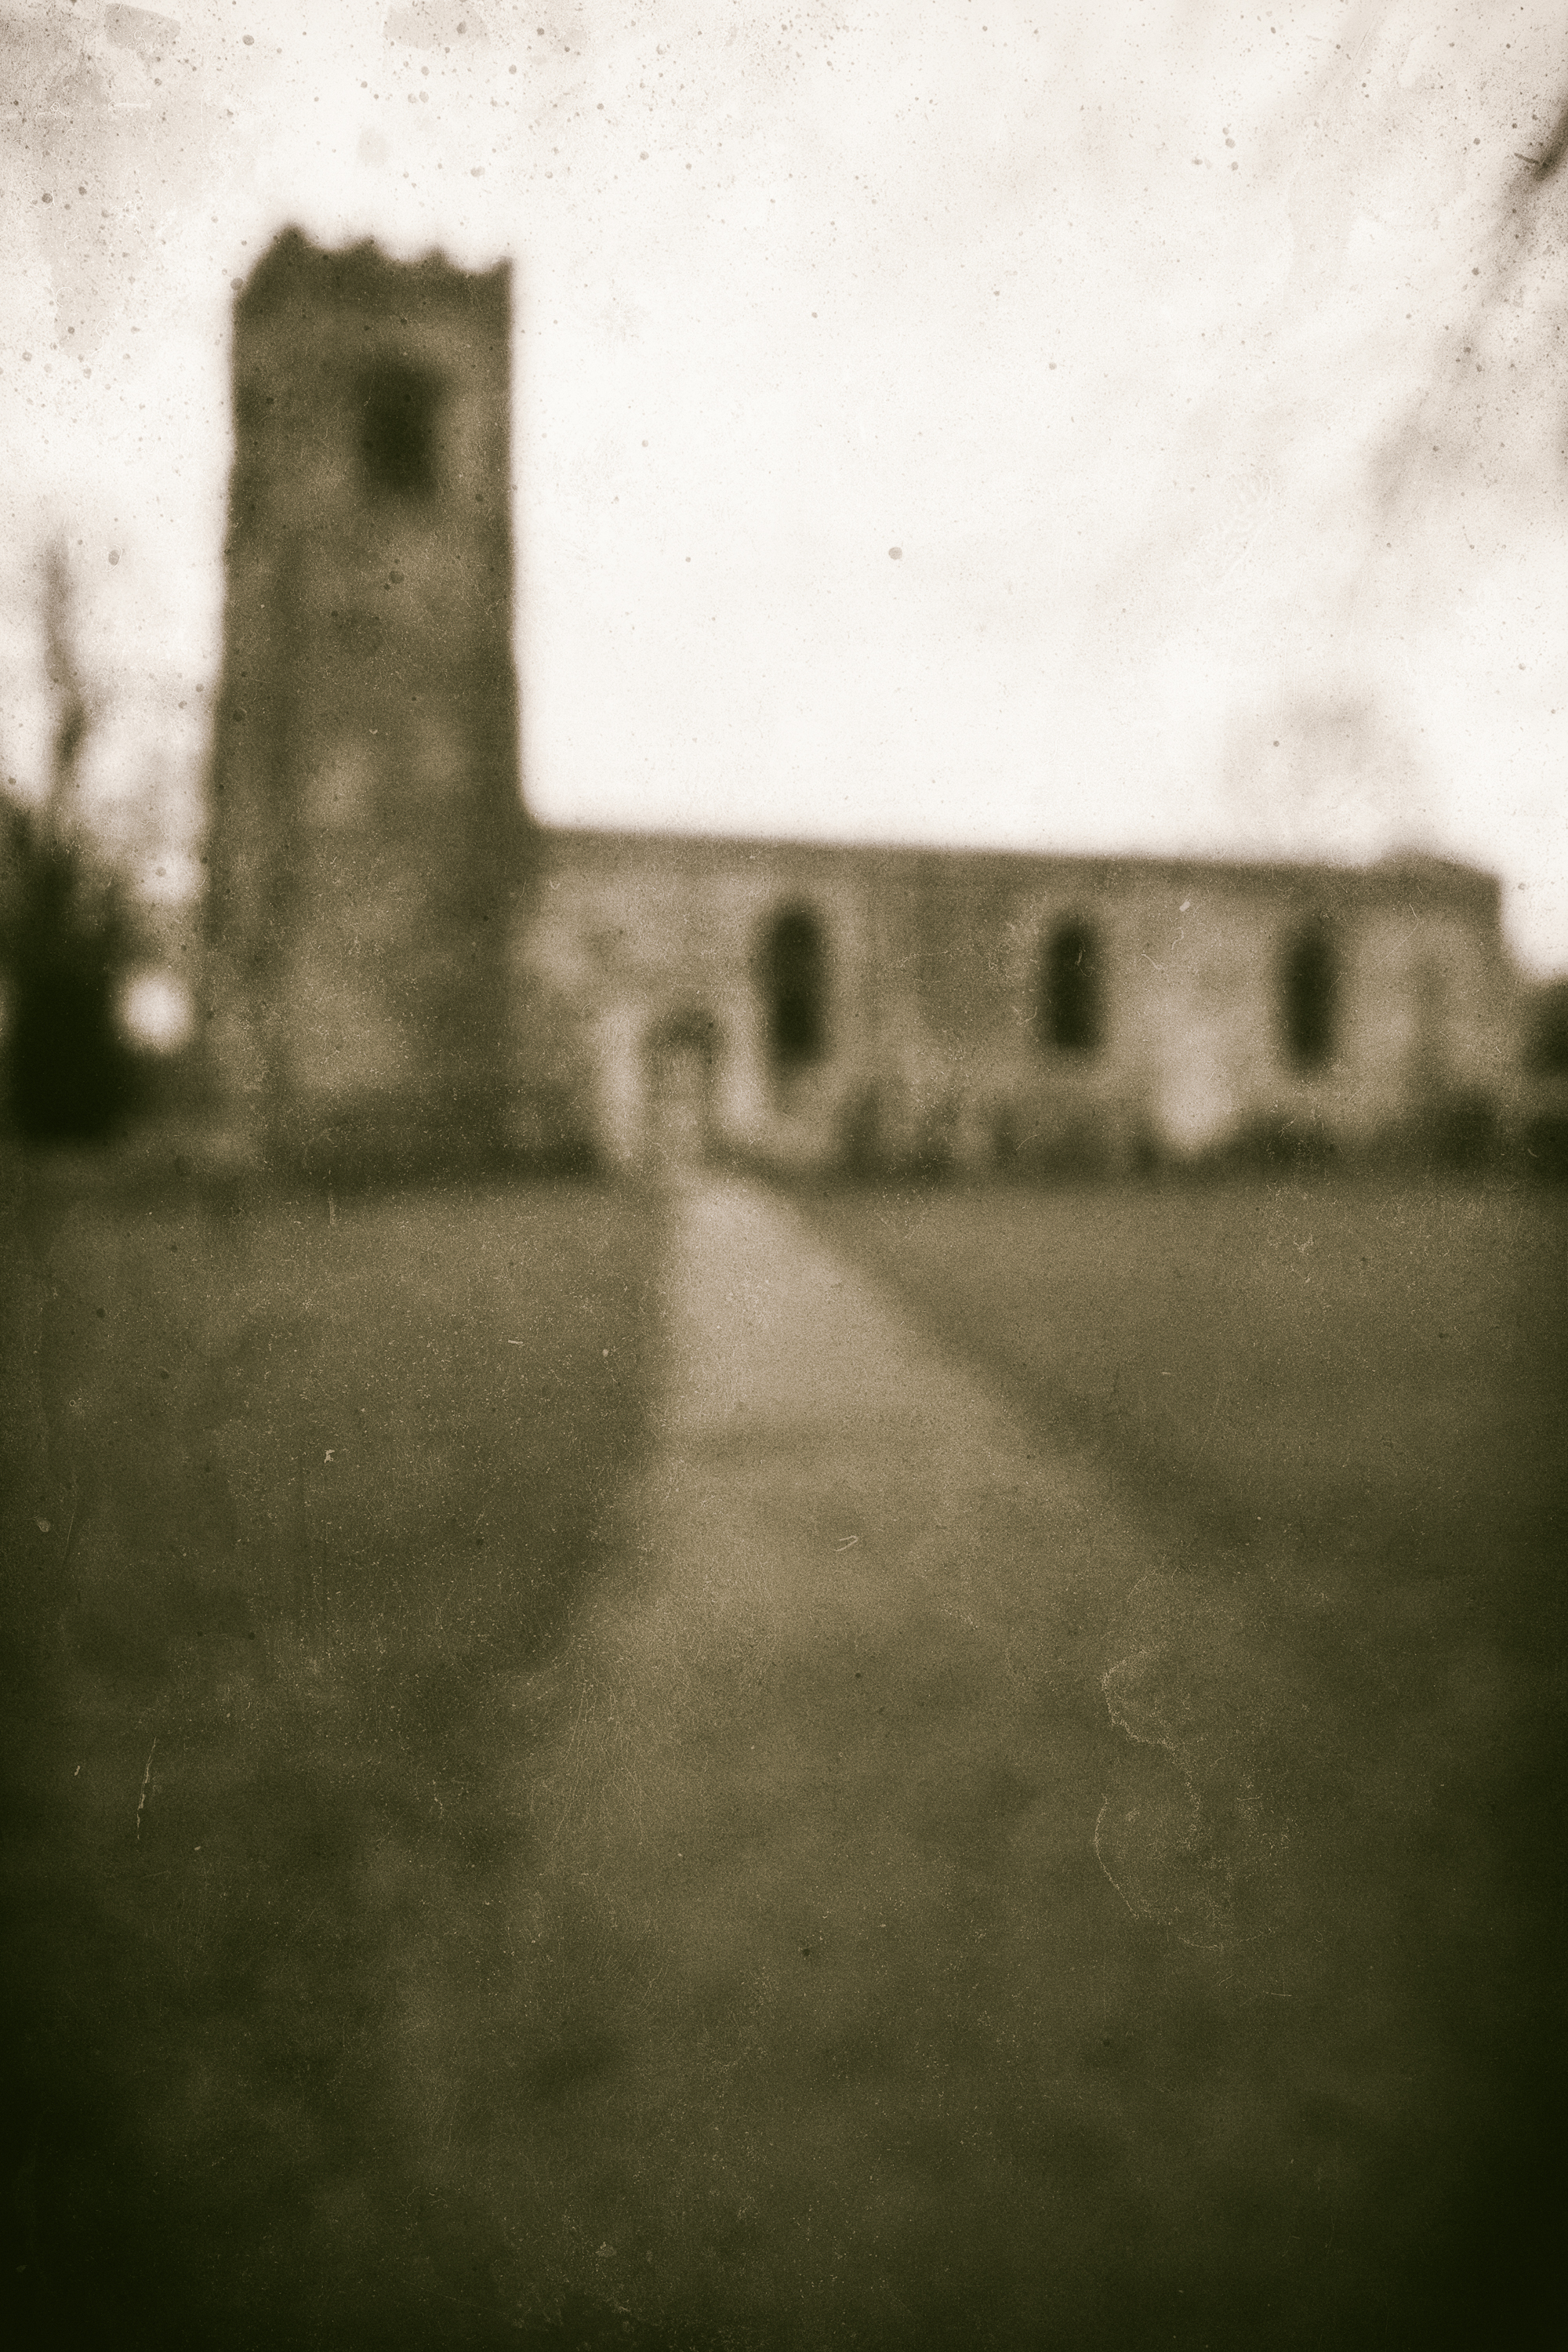
Wistow Church, Leicestershire shot using my pinhole.
Edit : Evening of Sunday 19th March.
I just had to try creating another pinhole. With the body cap already prepared it took much less time. All I had to do was cut some more aluminium, make the hole, sand it down, clean it and stick it in place. I took a quick test shot of the kitchen table using the new hole and it appears to be sharper. I won’t really be able to tell properly until I get out and shoot somewhere with it.
I’m feeling very frustrated with my photography at the moment. I think I’m going through the equivalent of “writer’s block” and I’ve been suffering from it for several weeks now, possibly months.
The weather doesn’t help. It seems that every time I get a chance to get out with a camera we’re covered in a heavy blanket of grey cloud which doesn’t shift. Photography is all about light, I need light to work with and everything is flat, grey and lifeless. The fact that I really like working with high contrast light just makes it feel worse.
But it goes beyond this. I feel like I’m wandering directionless. I know I need projects to work on and the harder I think about possible projects the less inspiration comes to me. Everything just feels impossible.
Okay so to take photographs we have to go out and shoot. So get the hell out there and shoot! Dull, grey day? Doesn’t matter. There will be photos out there just waiting to be taken. So I go out and it feels like I’m trying too hard. I’m trying to make images out of nothing. And the harder I try the worse it gets.
And then I start to think, “Why the hell am I even bothering? What does any of this matter? Who even looks at any of this rubbish I keep shooting?”.
It matters to me because making photographs is such a key part of who I am. It’s my one form of self expression. I can’t draw, I can’t paint, I can’t sing, I can’t play a musical instrument. I suppose I could write… Yeah I could, but I do it badly.
When I have so little free time to dedicate to taking photos it feels like I have to make the very best use of every moment I get. And yet I struggle to even know where to go to shoot. I’ve lived in the same place all of my life. I feel like I know everything so well. Too well. Seeing a place for the first time seems to open up so many photographic avenues, trying to make images in a place you know like the back of your hand can feel like trying to breath life back into the dead.
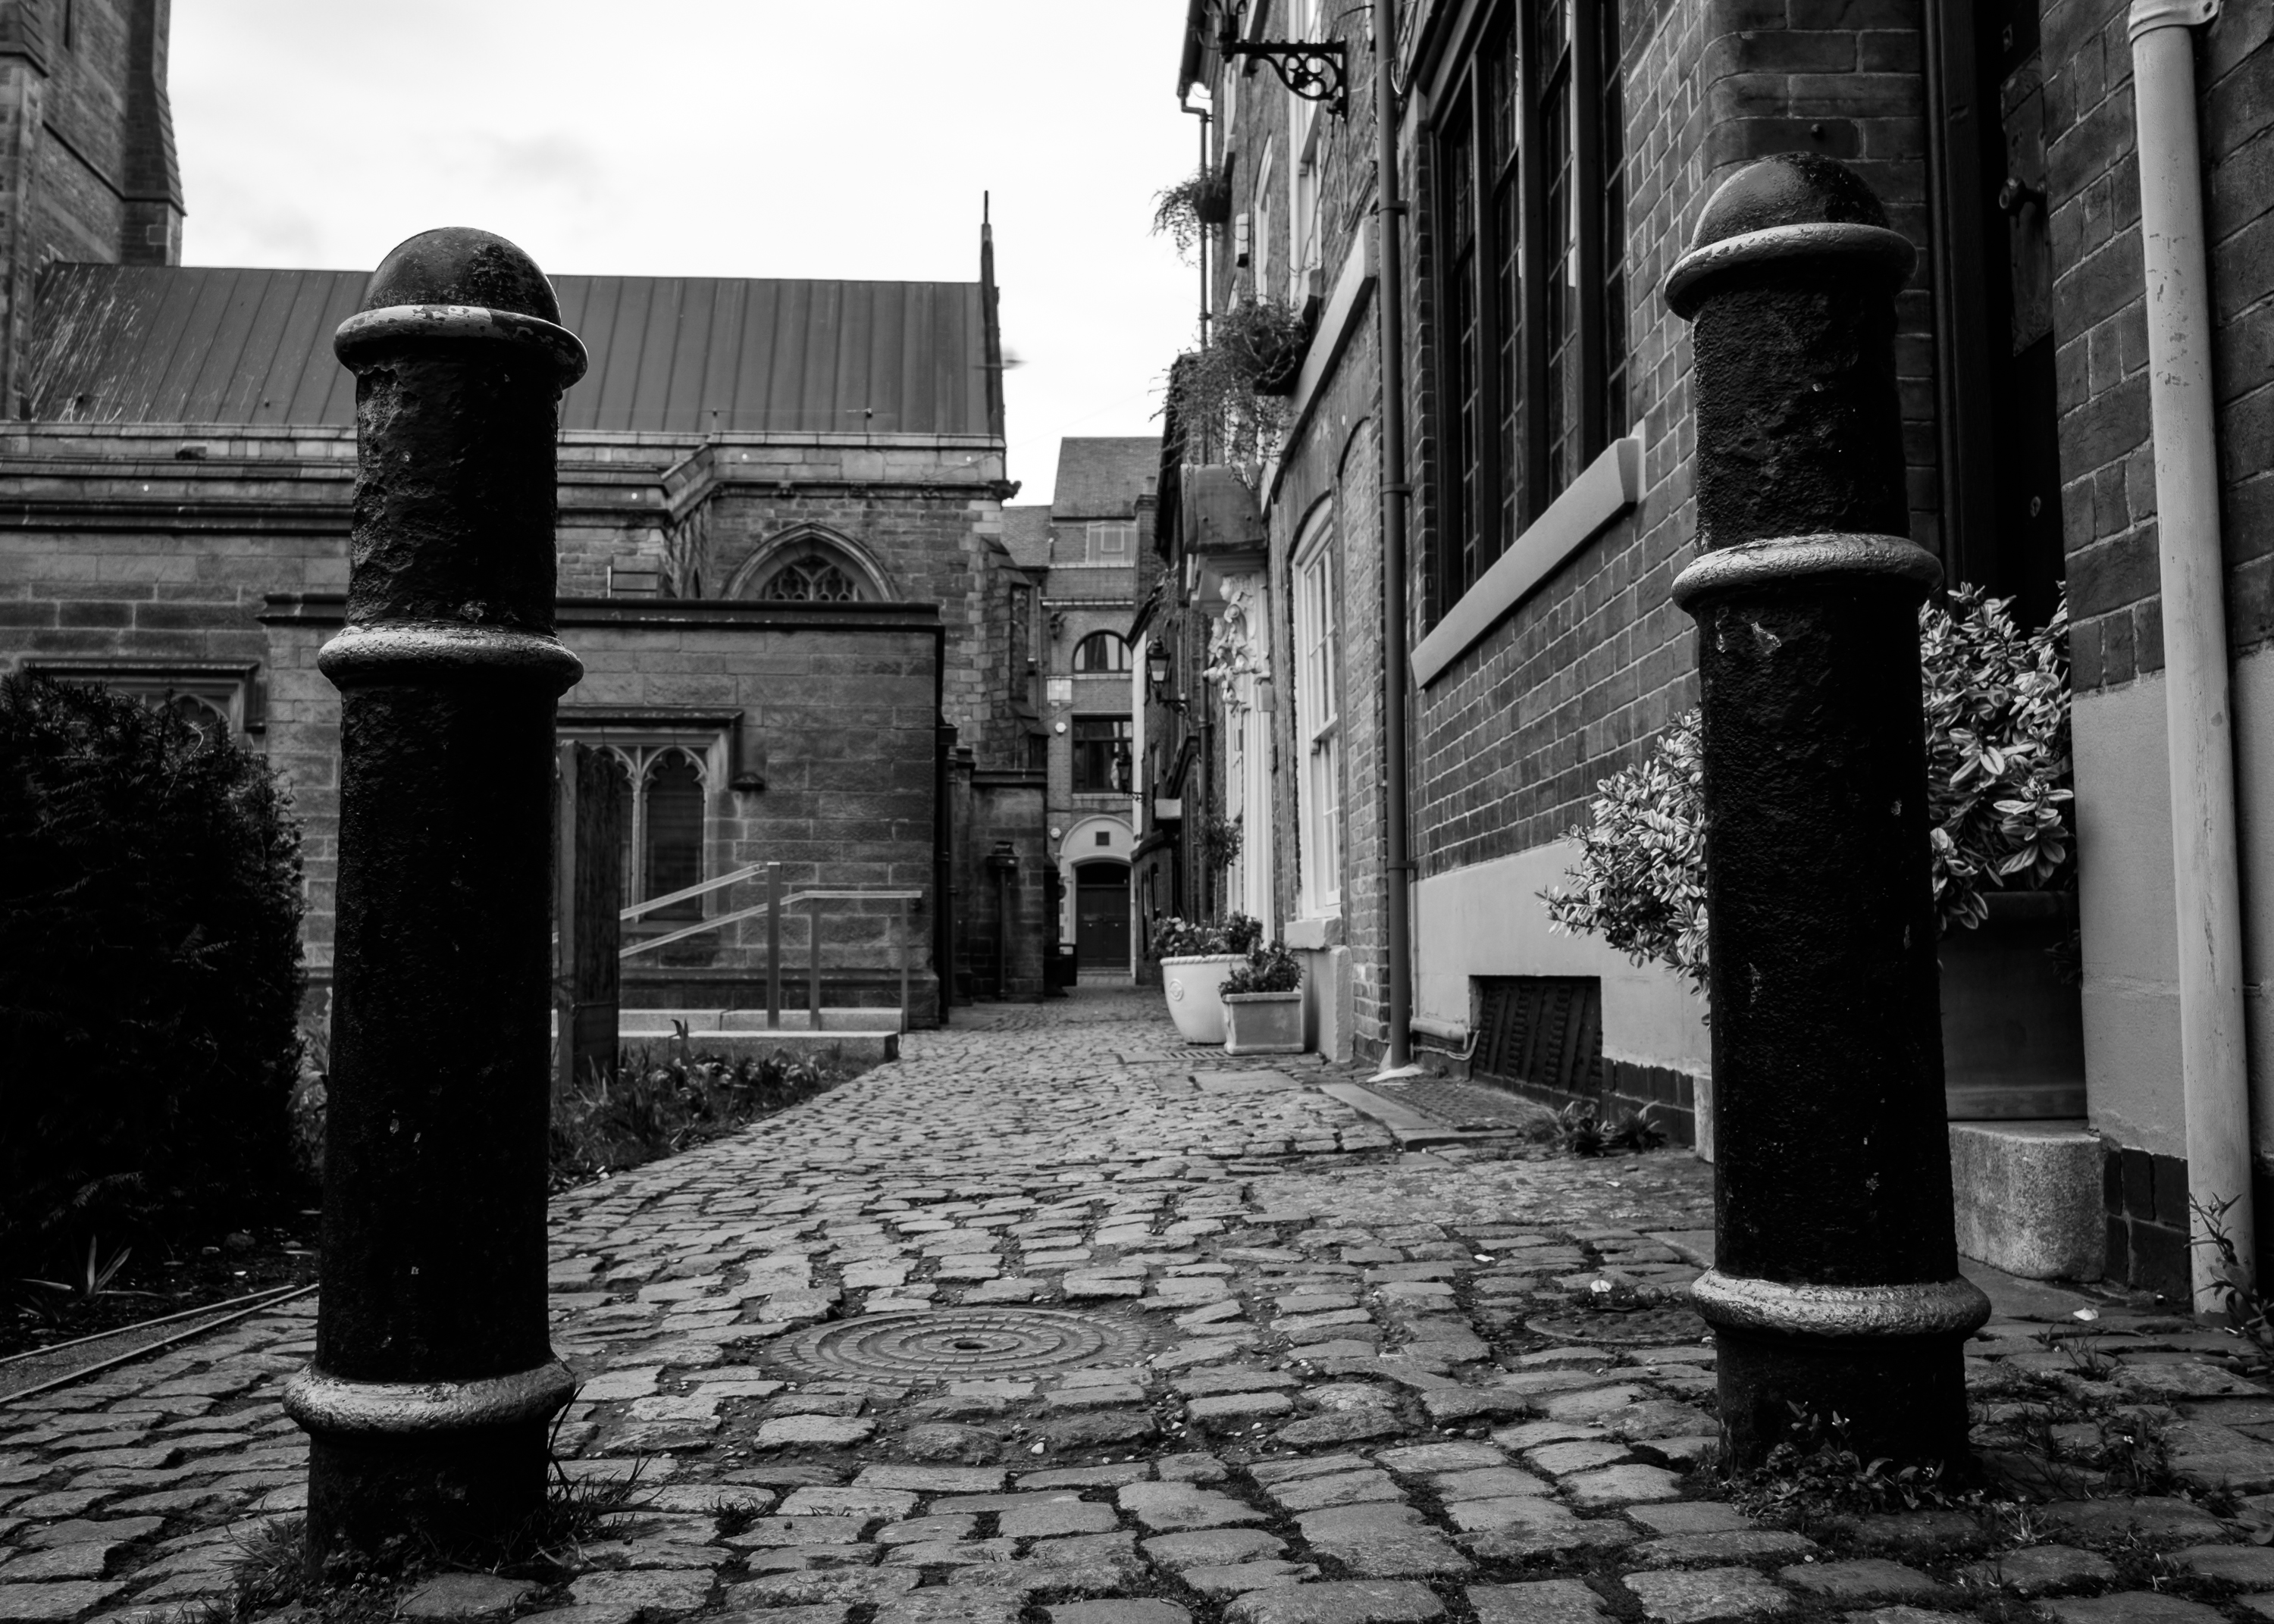
St. Martins East, Leicester.
I took a walk around the cathedral area of Leicester for a couple of hours or so earlier today. It’s a part of town I like a lot, interesting old buildings and steeped in history. I ended up taking around 90 photos out of which one or two were “meh, sort of ok”. I’m using them in this post.
So what can I do to get my mojo back?
It feels like I’m stuck in a rut and I need to come up with “something new”, approach my photography in a different way. It might not be about going to new places. It certainly isn’t about buying more kit. I think I need to go back to looking at lots of good photography by other people. I need to spend more time reading other people’s photography blogs.I need to think of projects I can work on and I need to actually get out there and shoot the ones I’ve already got in my head.
How can it be that I’ve had an idea for one project in my head for several years now and I’ve never even attempted to go out and shoot a single photo for it? Would it put me too far out of my comfort zone? Yes, I think it probably would. Maybe that would be a good thing?
It’s not that many music venues where you have to cope with a standard lamp on stage.
I’ve written before about my enjoyment of shooting at local music venues (see Shooting Musicians on my previous blog). It’s something which combines two of my loves (music and photography) and often provides a meet up with some friends as I’ve come to know quite a few people in the Leicester music scene over the years.
Up until now my gig photography had been the one thing which seemed to require me to lug around my Canon EOS 6D and a big, heavy L series zoom. I prefer shooting with my Fuji X cameras but whilst my X100T is certainly up to the job in terms of low light performance – both in image quality and autofocus reliability, the focal length is probably not ideal for the job unless I can actually get up on stage (which doesn’t happen).
My X-Pro1 would be more suited to the task as I have the 55-200mm zoom but I found it frustrating to autofocus in the extremely challenging lighting which most small music venues offer. Yes there was the option of manual focus but that can also be tricky to get right when musicians are hopping around a stage.
This was shot at ISO 3200 which was the lowest I got all night, shot at f1.4 on the 35mm. With the 55-200mm I was up at ISO 6400 and 8000.
When Fuji announced the X-Pro2 I knew that I just had to have one. I already have way too many cameras but the X-Pro1 is a camera I have enjoyed using so much that I knew I simply had to have its successor if I possibly could. Could I justify the not inconsiderable cost of the new camera? Yes, of course I could – photography is one of my main pleasures in life and a body like the X-Pro2 will give me several years of shooting fun. Life is short and if I had the money then I certainly should spend it on something which I will enjoy so much.
My X-Pro2 arrived on Sunday March 6th and I did a little local photo walk, despite the awful grey, flat light here that day. I then noticed that there was a local gig on Thursday which might be a good chance to get out to, take some photos and give the X-Pro2 a bit of a trial.
I ended up packing both my X-Pro2 and my EOS 6D and headed down to The Donkey on Leicester’s Welford Road to enjoy a night of mainly improvised music provided by “The Status Trio” and whoever wanted to get up on stage and join them. My plan was to start off shooting the X-Pro2 and if I got frustrated with autofocus issues I would have the 6D there to fall back on.
The 6D never left the bag all night!
55-200mm reaching all the way to the back of the stage for this shot of Neil Segrott on bass. ISO 8000, 1/125 at f4.8.
The X-Pro2 exceeded my expectations in every way. Autofocus was just as quick as my DSLR and I think more accurate. All the more impressive as none of my Fuji X mount lenses are ones which are regarded as particularly snappy in the focussing department. I took most shots that night with the 55-200mm, it has the reach to get in close for a head and shoulders of a musician on the stage and the image stabilisation really helps, especially in low light situations. I also had my 35mm f1.4 with me for wider shots. I didn’t take my only other X mount lens, the 18mm and I kicked myself for that. I spent most of the night sat or stood right next to the stage and the 18mm would have been very handy to grab some overviews of the whole scene.
I did have to fall back to manual focussing at one point as I tried to get some shots of the drummer who was sat in such a gloomy spot I think the 6D would have struggled to autofocus too. But this is where the mirror-less camera wins out, it’s very easy to focus manually with a camera which provides focus peaking and digital split frame focussing.
Some people just look like they were born to be a drummer. 1/125 f3.5 ISO 8000.
I didn’t try anything too fancy, I’m still familiarising myself with this camera so I didn’t play with the continuous focus tracking. One for another occasion.
I ended the evening feeling incredibly positive about the X-Pro2. It performed incredibly well under what are likely to be the most challenging lighting conditions I’m likely to throw at it. It feels solid, positive, reliable and seems to be everything I was hoping for in an update to the X-Pro1.
We even got to enjoy a bit of French rap. My language skills were not up to translating much of it but it was a great improvised performance.
The X-Pro1 and X100/X100T have been my favourite cameras to shoot. There’s this thing as a photographer when your camera feels more like an extension of yourself than just something you’re holding in your hand and all of my Fuji cameras feel like that to me. Shooting with them becomes a more organic process. It feels simple, natural and flowing.
As I write this I’m really looking forward to trying the X-Pro2 in as many different shooting scenarios as I can. And when I do I’ll be sure to write about it here.
I just can’t quite believe this was shot at ISO 8000.
I’ve been blogging for a number of years now over at SquonkyBlog. That was a “general interest” blog, I would write about anything that I was interested in. It was predominantly photography related but certainly not exclusively so.
I finally decided that it was photography that I really wanted to write about so I had to decide whether to carry on with the old blog or make a fresh start.
I decided on the latter.
This will let me make a clean break from my previous blog, not carry over any of the clutter and rubbish, let me do things the way I want to rather than the way that WordPress.com will allow me to and to concentrate on the photography. Because that’s what I’m passionate about.
I want to relate my experiences and thoughts when I’m out shooting. I want to talk about techniques and equipment which I find fun and useful. I want to encourage myself to get out and shoot more frequently. And hopefully along the line I’ll learn some new things, meet some new people and have a lot of fun.
And I’ll save saying anything else for the next post.


